This guide takes you from the zip file to a working AiX Forms menu. It takes about two minutes. Your licence key is emailed to you automatically when you buy, and one licence covers 3 websites, with unlimited forms and entries on each.
Installing the plugin:
- In WordPress, go to Plugins, then Add New Plugin, then click Upload Plugin.
- Choose the ResultsAiX Forms zip file and click Install Now.
- Click Activate Plugin.
- A new menu item called AiX Forms appears in the WordPress sidebar, with a feedback icon.
The plugin creates its three database tables (forms, entries and AI jobs) the moment it is activated. Nothing else needs setting up before you activate your key.
Activating your key:
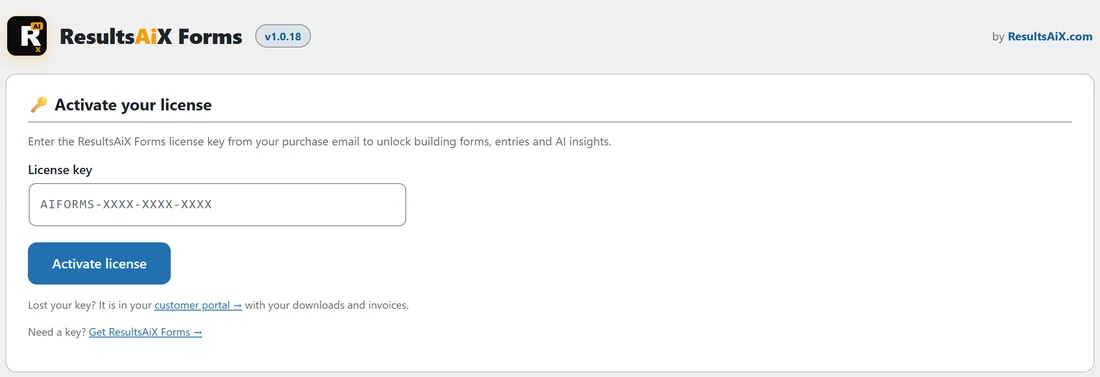
Until a key is active, the AiX Forms menu shows one screen called Activate your license.
- Open AiX Forms in the sidebar.
- Paste your key into the License key box. It looks like AIFORMS-XXXX-XXXX-XXXX.
- Click Activate license, or press Enter.
- You see "License activated successfully!" and the page reloads with the full set of tabs.
Spaces are removed and small letters are capitalised for you, so a straight paste from the email works. Lost your key? The screen links to your customer portal, where every key, download and invoice is kept.
The License panel:
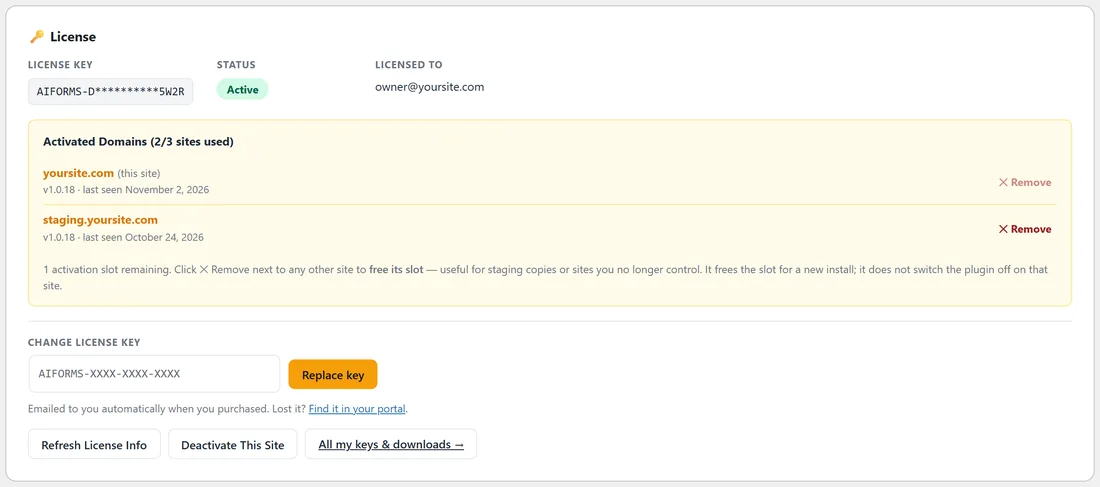
Once active, open the Settings tab. The License panel sits at the top.
- License Key shows your key with the middle hidden.
- Status shows a green Active pill.
- Licensed To shows the email on your key.
- Activated Domains lists every site using this key for ResultsAiX Forms, with how many of your sites are used, the plugin version on each site and when it was last seen. The site you are on is marked (this site).
In the Northfield Renovations example, the key is active on yoursite.com and on staging.yoursite.com, so the panel reads 2/3 sites used and says 1 activation slot remaining.
The buttons in the panel:
- Refresh License Info pulls the latest details from the licence server.
- Deactivate This Site releases the site you are on, ready to move the key elsewhere.
- Remove next to another site frees its slot. It frees the slot for a new install; it does not switch the plugin off on that site. This is handy for staging copies and sites you no longer manage.
- Change license key, with the Replace key button, swaps to a different key. The box is never filled in with your current key, so nobody looking over your shoulder sees it.
- All my keys and downloads opens your account portal.
Moving to a new site:
- On the old site, open Settings and click Deactivate This Site. If the old site is already gone, click Remove next to it from any other site on the same key.
- Install ResultsAiX Forms on the new site.
- Paste the same key into Activate your license.
Switching the plugin off keeps your licence:
Deactivating ResultsAiX Forms on the Plugins screen, for example while you test another plugin, does not release your licence. Switch it back on and everything carries on where it was, with no key to paste again. Only Deactivate This Site, or Remove from another site, releases a site.
Deleting the plugin keeps your leads:
If you delete the plugin from the Plugins screen, its settings are removed but your forms, your entries and any uploaded files stay in the database. Install it again and they are all there. The only button that removes form data is in the Danger Zone on the Settings tab. See Privacy And GDPR: Consent, Data Retention And The Danger Zone.
What you need before you start:
- WordPress 5.0 or newer and PHP 7.4 or newer. The Diagnostics tab shows both.
- An administrator account on the site.
- The ResultsAiX Forms zip file and your licence key, both in your purchase email and your customer portal.
Installing on a staging copy first:
Many site owners try new plugins on a staging copy before the live site. One licence covers 3 websites, so you can activate the same key on both. When the staging copy is no longer needed, click Remove next to it in the License panel on the live site to free the slot.
What the Settings tab shows when the key is active:
Under the License panel you find four help cards: Your account portal (keys, downloads and invoices), Need a hand? (Contact support), Troubleshooting (Open Diagnostics) and Training and docs (Open Training). The rest of the Settings tab holds Appearance, Notifications, Spam protection and Privacy.
After activating, a good first ten minutes:
- Open Settings, Notifications, and set your From name and From email, for example your business name and hello@ your domain. See Email Notifications, Confirmation Emails And Merge Tags.
- In the same place, set the Default notification email, the inbox where new entries should go.
- Open the Training tab and read Quick start.
- Build your first form. See Quick Start: Your First Form Live In Five Minutes.
- If you want AI drafting and insights, add a key on Integrations and AI.
Checking the connection to the licence server:
Open the Diagnostics tab. The Licence server row should say Reachable, with the time the check took. If it says Not reachable, click Check again. If it stays that way, ask your web host to allow outgoing HTTPS connections from your site.
Updating the plugin:
New versions arrive through the normal WordPress update screens, under Dashboard, then Updates, and on the Plugins screen. Click Update now as with any plugin. Updating never touches your forms, entries or settings. After an update, the version number in the plugin header and on the Diagnostics tab shows the new version.
Several sites, one key:
A licence covers 3 websites. Each site where you activate the key appears in Activated Domains, with its own version and last seen date, so you can see at a glance which sites need an update. The count at the top, for example 2/3 sites used, tells you how many slots are left.
If the activation message asks you to check something:
- "License key not recognized. Please check your purchase email." Copy the key again from the email, all of it, and paste it once more.
- "This key is valid but does not include ResultsAiX Forms." You have pasted the key for a different product. Your portal lists every key with its product.
- "This license has no available sites left." Free a slot with Remove on another site, then activate again.
- "Could not reach the license server, so the key could not be checked. Nothing was changed." Wait a minute and try again. The Diagnostics tab shows whether your site can reach the licence server, with a Check again button.
Good to know:
- The plugin checks your key once a day in the background. If the licence server cannot be reached, nothing changes on your site.
- Forms you have already published keep showing and keep collecting entries whatever the admin screen shows.
- Updates arrive through the normal WordPress update screens, and the Diagnostics tab shows whether your site can reach the update server.
Next, follow Quick Start: Your First Form Live In Five Minutes.