This is the shortest way from a fresh install to watching your visitors and talking to them. Five steps, about five minutes, and most of them are one click. Everything here can be changed later.
Before you start:
- Pulse installed on your main WordPress site, from Plugins, Add New Plugin, Upload Plugin.
- Your ResultsAiX Bundle key. It is on your purchase email and in your account portal.
Step 1: activate Pulse:
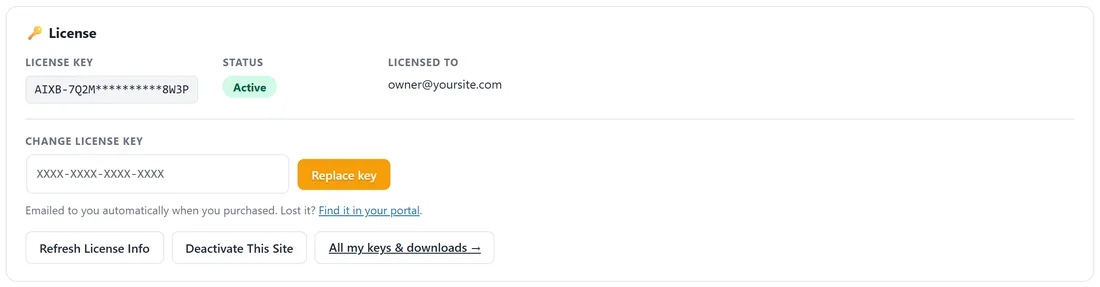
- In the WordPress menu, open ResultsAiX Pulse. Until a key is active, Pulse opens on its activation screen.
- Paste your Bundle key and activate it. The Licence panel then shows the masked key, the status Active and the email it is licensed to.
- Pulse switches on the moment the key is accepted. Until then it collects nothing and shows nothing on your site.
Step 2: open the Live View:
- Open the 🌍 Live View tab.
- The tracker is already running on this site. There is no code to paste, because Auto-load tracker on this site is on by default (Settings, Data & Access).
- Your own visits are never counted, so to see a visitor arrive, open your site in a private window or on your phone with wifi off. Within a few seconds a dot appears on the globe.
Step 3: install the location database:
- Open ⚙️ Settings and click Privacy & Location to open it.
- If no database is installed yet, press Download The Free Geo Database. It is saved to your uploads folder and refreshes itself monthly.
- From then on every visitor is placed on the map from a file on your own server. The Dashboard's Setup list also has an Install button for this.
Step 4: switch on the chat:
- Open 🗨️ Chat Setup.
- Under Visitor Chat, tick Enable visitor chat.
- Type Your name in the chat (people see it beside your messages), a Popup title and pick a Colour.
- Press Save Chat Setup. A Talk button now sits next to every visitor in the Live View.
Step 5: connect your assistant (optional):
- Open ✨ AI Assistant.
- Under Connect A Key, press Get Your Free Key on the Google Gemini card. A free key takes about a minute and needs no card.
- Paste it, press Test connection, then Save AI Assistant.
- Under Teach It Your Business, type what you sell, your prices, links and the tone you want. The assistant answers only from what you give it.
Step 6: add your other sites (optional):
Open 🔌 Connections. Under Your Sites, type a site name and its domain and press + Add Site, then Get The Code on its row. See More Than One Site: The Hub and Pairing Codes for the rest.
The Setup list on the Dashboard:
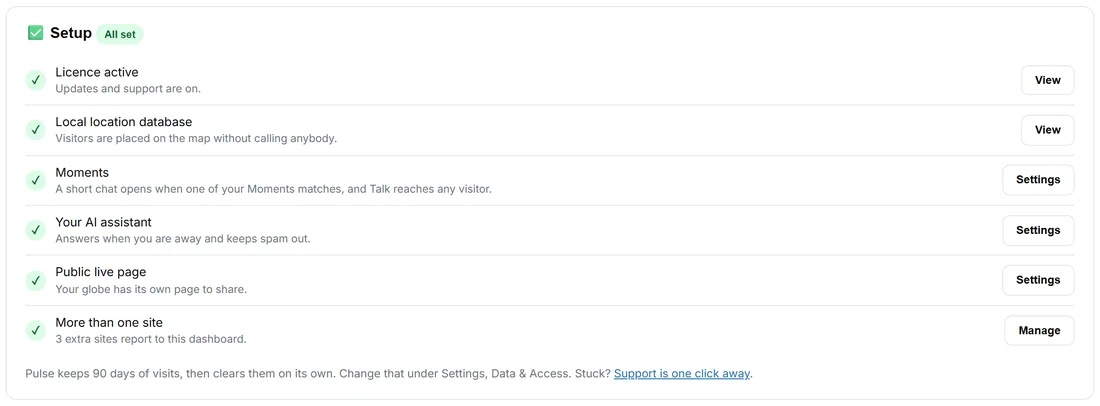
At the bottom of the 📊 Dashboard, the Setup card lists each of these with a tick when it is done: Licence active, Local location database, Moments, Your AI assistant, Public live page and More than one site (with the ResultsAiX Mailer on the site, Chat leads go to your Mailer list joins it too). Each row has a button that takes you to the right place: View, Install, Settings, Connect or Manage. When everything needed is done, the card says All set.
A real example:
The owner of yoursite.com activates Pulse at 9:00, installs the location database, ticks Enable visitor chat with the name Sam and a gold colour, and connects a free Gemini key. At 9:05 the Live View shows two visitors: one reading the golden hour blog post from Dublin, one on the pricing page from Toronto. Sam presses Talk on the pricing visitor and asks if they have a question about the courses.
Tips:
- Leave the Live View open in a browser tab. It updates by itself.
- Write your first Moment next. Moments: The Right Words to the Right Person shows how.
- If a step will not go green, open 🩺 Diagnostics. It checks each part and says what to do.