ResultsAiX Publisher installs like any other WordPress plugin. It needs WordPress 5.8 or newer and PHP 7.4 or newer.
Until a licence key is active on the site, the plugin shows only its activation screen. Once the key is accepted, every tab opens.
Installing the plugin:
- In WordPress go to Plugins, then Add New Plugin, then Upload Plugin.
- Choose the results-ai-publisher ZIP file and click Install Now.
- Click Activate Plugin. An AiX Publisher item appears in the admin menu, with a book icon.
Activating your licence:
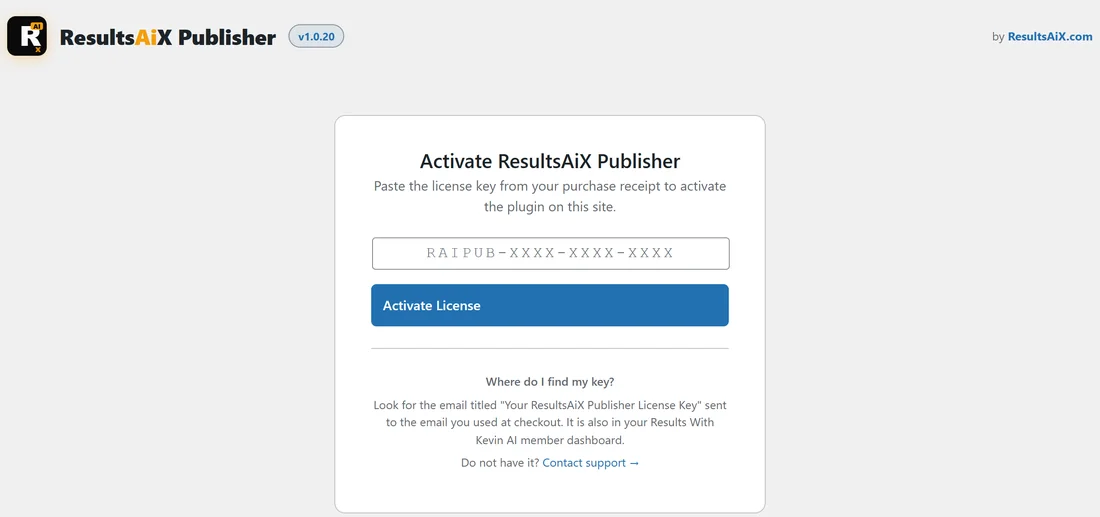
- Click AiX Publisher in the admin menu. The screen says Activate ResultsAiX Publisher.
- Paste your key into the key box. Keys are not case sensitive; the plugin turns them into capitals for you.
- Click Activate License. The button says Activating... while the key is checked.
- When the key is accepted, the plugin opens its Dashboard.
Where do I find my key?
The activation screen tells you: look for the email titled Your ResultsAiX Publisher License Key, sent to the address you used at checkout. Your keys are also in your account portal. If you cannot find it, the Contact support link on the same screen opens the support page.
If the key is not accepted:
The plugin shows a short message telling you why. These are the messages and what to do:
- This key does not include access to ResultsAiX Publisher: check that you pasted the key for this product.
- License has no available seats. Deactivate an old install first: free a site in the licence panel of a site you no longer use, then try again.
- The licence server could not be reached just now, so the key could not be checked. Nothing was changed. Please try again in a minute: wait a moment and click Activate License again.
Your licence panel in Settings:
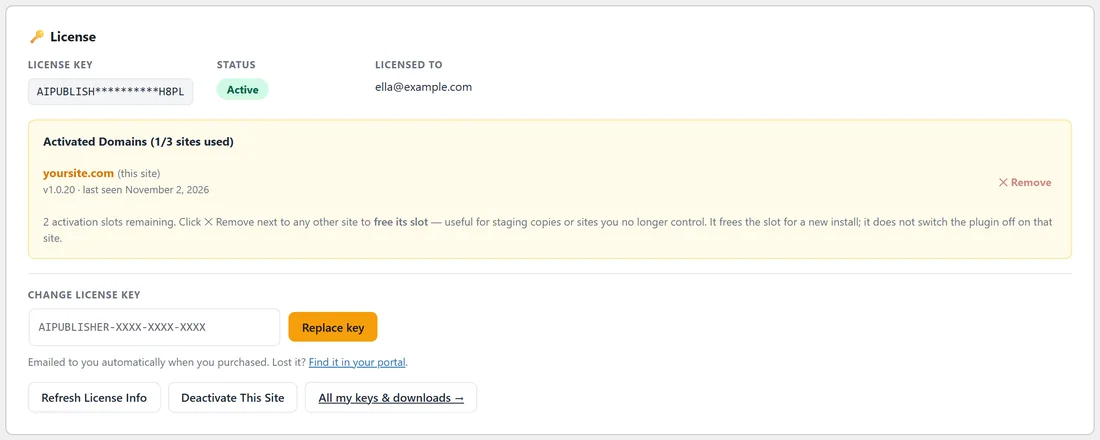
After activation there is no separate License tab. Your licence lives in a panel at the top of the Settings tab, and old links to a License tab open Settings for you.
The panel shows:
- License Key, shown masked, and a Status badge such as Active.
- Licensed To, the email on the key.
- Activated Domains, with how many sites are used, each site's plugin version and when it was last seen. Your current site is marked this site.
- A Remove link next to each site, which frees that site's slot so you can use it somewhere else.
- Change License Key, a box with a Replace key button for pasting a different key.
- Refresh License Info, which asks the licence server for the latest details.
- Deactivate This Site, which frees this site's slot.
- All my keys & downloads, a link to your account portal.
Moving the plugin to another site:
- On the old site, open Settings and click Deactivate This Site.
- Install the plugin on the new site and activate it with the same key.
You can also free the old site from the new one: click Remove next to the old site under Activated Domains.
Updates:
Plugin updates arrive through the normal WordPress updates screen. The updater runs separately from the licence check, so a site can always receive a fix.
What to do next:
Make your first book with Quick Start: Your First Book In Four Steps, then look round the tabs with The Admin Tabs At A Glance.