ResultsAiX Video installs like any other WordPress plugin and is ready the moment your licence key is active. There are no servers to set up, no AI models to install by hand and no render credits to buy. This guide takes you from the zip file to your first open Create Video screen.
Where to find it:

After activation the plugin adds a top level menu called AI Video to your WordPress sidebar. The same tabs sit at the top of every plugin screen, so you can move around without going back to the sidebar.
Install the plugin:
- In WordPress, go to Plugins, then Add New, then Upload Plugin.
- Choose the results-ai-video zip file from your purchase and click Install Now.
- Click Activate Plugin. The AI Video menu appears in your sidebar.
Activate your licence:
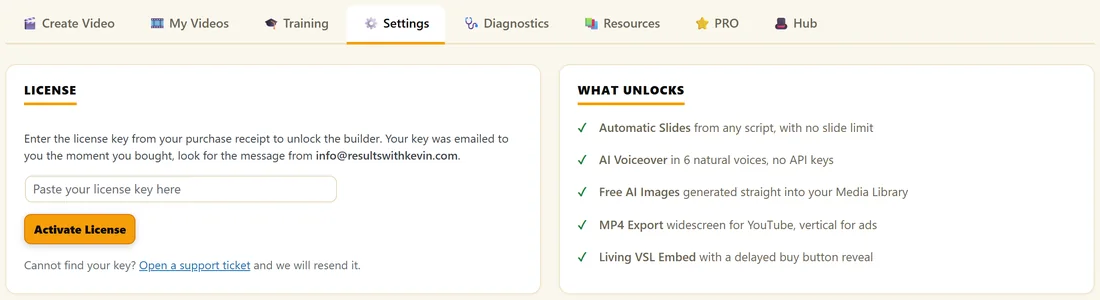

- Open AI Video, then the Settings tab.
- Paste the licence key from your purchase email into the box. It was sent from info@resultswithkevin.com the moment you bought.
- Click Activate License. The full Settings screen opens and Create Video and My Videos unlock.
Until the key is active, Create Video shows an Activate Your License card with a Go To Settings And Activate button, and My Videos asks you to activate first. Settings always stays open so you can paste the key straight away.
The tabs:
- Create Video: the builder where you make each video, both Slides Video and Animated Story.
- My Videos: every saved video as a card, with search, folders, Duplicate and Delete.
- Training: a short in dashboard guide, plus the Voice Engine download buttons for Windows and Mac.
- Settings: your AI keys, what each AI does, defaults, free picture engines, AI usage, Brand Kit (PRO), Appearance, Storage and Licence.
- Diagnostics: health checks, the Error Log and the Audio Pipeline Debug.
- Resources: guides and tools that work alongside ResultsAiX Video.
- PRO: the PRO upgrade screen. When the ResultsAiX Video PRO plugin is installed, this tab is where you enter your PRO key.
- Hub: the ResultsAiX Hub, which shows every ResultsAiX plugin, licence and update in one place when it is installed.
A real example:
The owner of Yoursite Studio uploads the zip, activates it, opens Settings and pastes her key. The screen reloads with the full settings, and the Create Video tab now shows the empty builder with the Slides Video and Animated Story buttons at the top. She leaves everything else as it is and goes straight to Create Video.
A five minute tour after activation:
- Open Create Video. Look at the two buttons at the top, Slides Video and Animated Story, and leave Slides Video selected.
- Open My Videos. It says No videos yet. Click New Video to build your first one, which takes you back to Create Video.
- Open Training. The quick start there matches the five steps of this guide, and section 3 has the Voice Engine downloads.
- Open Settings. Check Defaults: the theme, format and voice your new videos will start with.
- Open Diagnostics. Every line should show a green tick. If one does not, the line says what it found.
Updating and reinstalling:
New versions appear on your Plugins screen like any other plugin. Your videos, keys and settings stay where they are when you update, and even when you delete and reinstall the plugin.
Best browser:
Generate voices and export in desktop Chrome, Edge or Brave. A recent graphics card makes it faster, and ordinary computers work too. Anyone watching your finished MP4 or your living VSL can use any browser or phone.
If the AI Video menu does not appear:
Check that the plugin shows as active on the Plugins screen, then reload the dashboard.
Tips:
- You do not need an AI key to start. Pasting your own script, the built in voices, themes and MP4 export all work without one. See Connecting AI (Optional Bring Your Own Key) when you want the AI writer.
- If a Hub tab shows The Hub Is Not Installed Yet, that is simply an invitation to add the free ResultsAiX Hub. Nothing in ResultsAiX Video needs it.
- Next, read Writing Or Generating Your Script and make your first video.