The setup wizard builds a working members area for you. It asks which of two situations you are in, then shows only the steps for that one: a new membership with its level, pages and locked content, or the way to carry an existing membership plugin across.
Nothing is charged and nothing is emailed to anybody while it runs, and you can stop at any point. It is the quickest way to start if you have never set up a membership site before.
Where to find it:
- It opens by itself the first time you go into the admin after activating the plugin, as long as the site has no levels yet.
- Until you finish or skip it, a short notice on the plugin's own screens offers Open the setup wizard.
- At any time: AiX Membership, then the Settings tab, then the Setup wizard section, then Open the setup wizard.
To leave it, click Skip setup at the top right, or Skip this and go to the dashboard on the first screen.
The first screen:
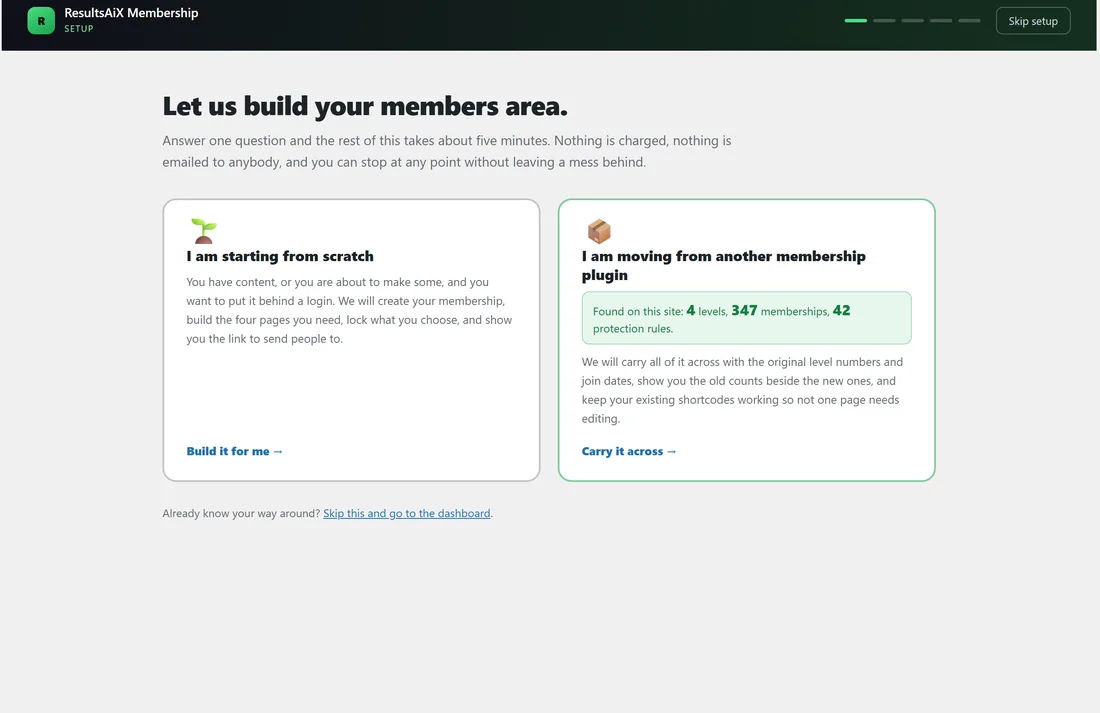
The wizard opens with Let us build your members area and two cards.
- I am starting from scratch: for when you have content, or are about to make some, and want it behind a login. Click Build it for me.
- I am moving from another membership plugin: for when your members are in WishList Member or Paid Memberships Pro. If the wizard finds that plugin's data on this site, the card shows what it found, for example the number of levels, memberships and protection rules. Click Carry it across.
Starting from scratch, step by step:
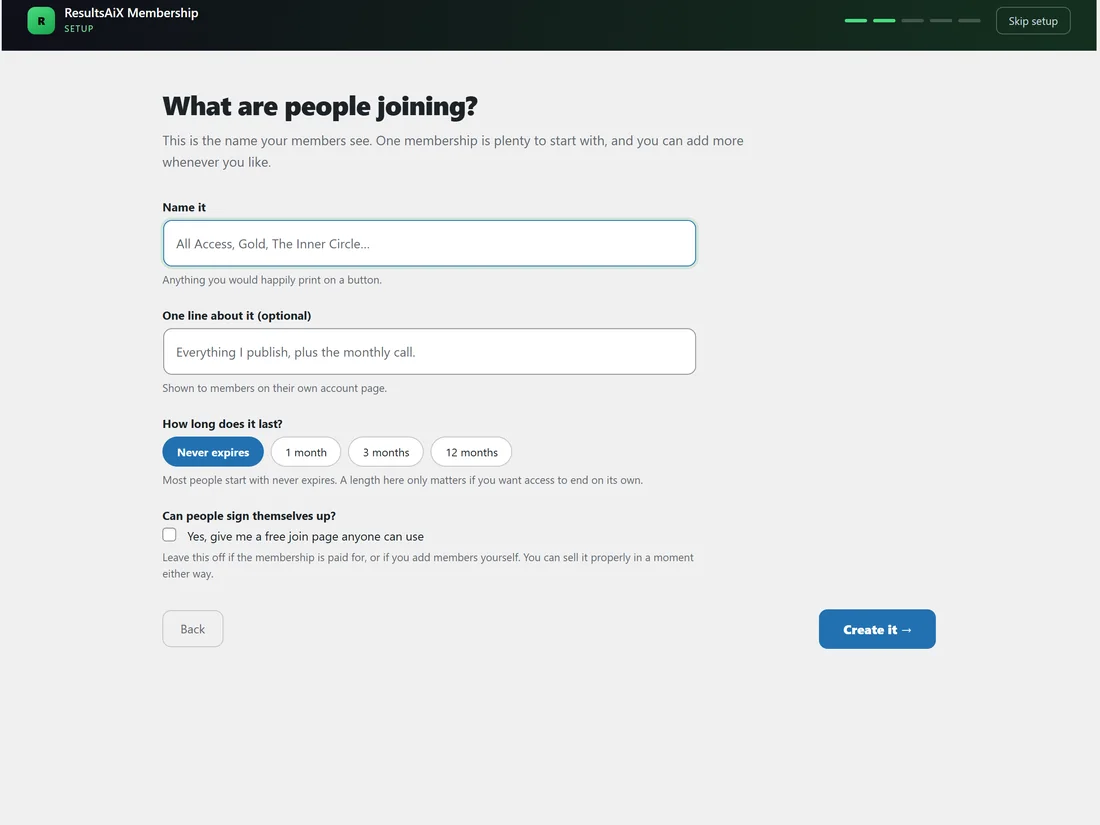
- What are people joining. Type the name members will see in Name it, for example Gold or All Access. Add an optional line in One line about it, which is shown to members on their account page.
- Choose How long does it last: Never expires, 1 month, 3 months or 12 months. Most people start with Never expires.
- Under Can people sign themselves up, tick Yes, give me a free join page anyone can use if the level is free and open to anyone. Leave it off for a paid level or one where you add members yourself.
- Click Create it. The wizard creates the level.
- The four pages a members area needs. Untick any you have already built, then click Create the pages.
- What should members only see. Tick any published pages and posts that should be behind the login. In Hold it back for a while, enter a number of days after joining before they open, or leave it at 0 for straight away. Click Lock them.
- Your members area is live. The last screen lists what was built and suggests what most people do next. Click Go to my dashboard.
The four pages:
The wizard creates normal WordPress pages that you can edit like any other.
- Members Home: where members land after logging in. It is protected for your new level and shows a welcome line and the member's memberships.
- Log In: your own login page with [raxm_login], so people never see the WordPress one.
- Join (named Join plus your level name): the signup page with [raxm_register] for your level and a login form for people who already have an account. This becomes the link you send people.
- My Membership: the [raxm_profile] page, showing what each member holds, what it opens and what they were reading. It never shows money.
What the wizard sets for you:
- The level's after-login and after-registration redirects point at Members Home.
- If you have not set them already, the site's login page becomes your new Log In page, and the after login page becomes Members Home.
- If you created a Join page and no no-access page was set, visitors without access are now redirected to the Join page instead of seeing the protection message. You can change this on the Settings tab under When someone without access opens protected content.
The wizard counts a month as 30 days, so 1, 3 and 12 months set Membership expires after to 30, 90 and 360 days on the level. Change the number on the level any time.
Moving from another membership plugin:
If the wizard finds the old plugin's data, the next screen shows the counts and explains the three buttons on the Import tab, in order: levels and settings, content protection, then members with their original join dates. Click Open the importer to go there. After the import, a verification screen puts the old counts next to the new ones, and compatibility mode keeps your existing pages and shortcodes working.
If it finds nothing, it says so and suggests the two likely reasons: the old plugin is on another site (export a CSV there and import it on the Import tab), or you are actually starting fresh (go back and choose the other card).
See Migrating From WishList Member and Migrating From Paid Memberships Pro for the full steps.
A real example:
Yoursite Academy starts from scratch. In Name it the owner types Free Photo Club, adds Weekly photo tips and the beginner lessons, keeps Never expires and ticks Yes, give me a free join page anyone can use. The wizard creates the level, then the pages Members Home, Log In, Join Free Photo Club and My Membership. On the next screen the owner ticks the three beginner lessons that are already published and leaves the days at 0. The finish screen links straight to each new page, and the Join page is the link that goes into the newsletter.
Running it again:

The wizard looks for a level or page it already made before creating anything, so running it a second time never leaves duplicates. If you type the name of a level that already exists, it uses that level.
Tips:
- Start with one level. You can add more on the Levels tab whenever you like.
- If the membership will be paid, leave the free join page off and set the price after connecting Stripe. See Paid Levels: Putting A Price On Access.
- Nothing published yet is fine. Write your first members-only page later and tick Protect this content in the editor sidebar.