Already use an email service? Connect it once and every survey can send its opt-ins straight there, into the list you pick and with the tags you choose. It is built into ResultsAiX Surveys and works on any site, with or without ResultsAiX Mailer.
Where to find it:
Open Integrations & AI and scroll to Your autoresponder. You connect one email service per site. Each survey then picks its own list and tags for it on the Opt-ins & Routing step.
The services you can connect:
Pick one in Your email service:
- AWeber, the full connection: lists and real tags, and returning subscribers get the new tags too.
- AWeber (simple, no login): just your list's unique list ID. Tags are real AWeber tags. The sign-up is sent by your visitor's browser, the way an AWeber form works.
- Mailchimp, ActiveCampaign, Kit (ConvertKit), GetResponse, Systeme.io and HighLevel (GoHighLevel): real tags, added to the tags a contact already has, never replacing them.
- Brevo and SendFox: these have no tags you can add from outside, so each tag becomes a list of its own there, called Tag: and your tag, created the first time it is used.
- LeadsLeap (SendSteed): you type in your list ids once, and a tag can stand for a list you made in LeadsLeap.
- Another service (HTML form): any service with a sign-up form. Paste the form's address and field names, and name the field that should carry the tags.
What each one asks for is in What Each Autoresponder Needs: Keys, Lists And Tags By Service.
Connect it, once:
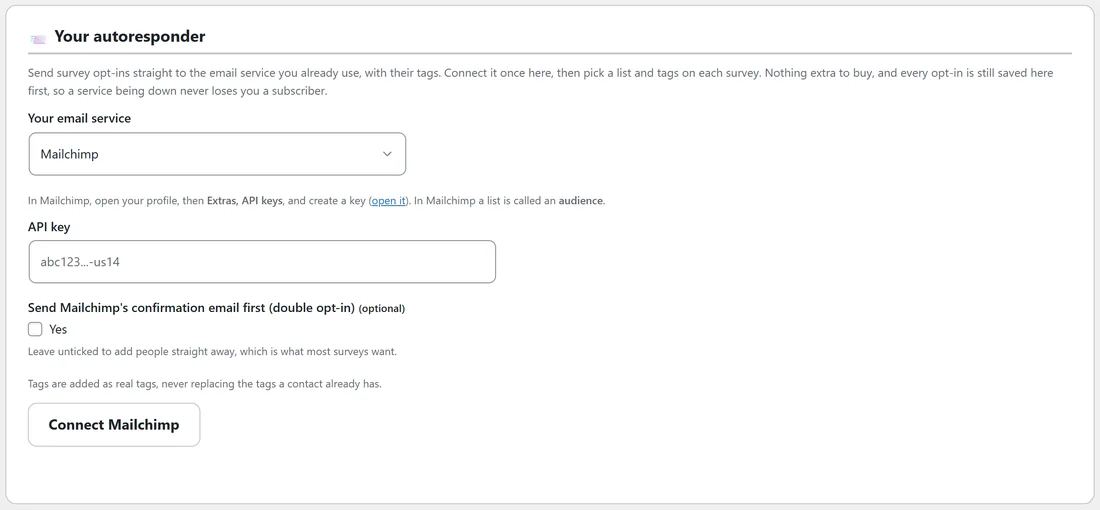
- Open Integrations & AI and find Your autoresponder.
- Pick your service. The steps for finding its key appear under the picker.
- Paste the key and fill in the other fields. For the full AWeber connection, click Open AWeber, allow access and paste the code AWeber shows you.
- Click the Connect button. The connection is tested first and only saved as connected if the service accepts it. If the service says no, you see its exact words.
- The card now says Connected to your service, with how many lists were loaded.
Send a test contact:
Under Send a test contact, type your own address, pick a list, keep or change the tags (survey-test is filled in), and click Send test contact. One real contact is sent straight away and the message shows exactly what the service said. Open your service and check the contact arrived with its list and tags.
What you see once it is connected:
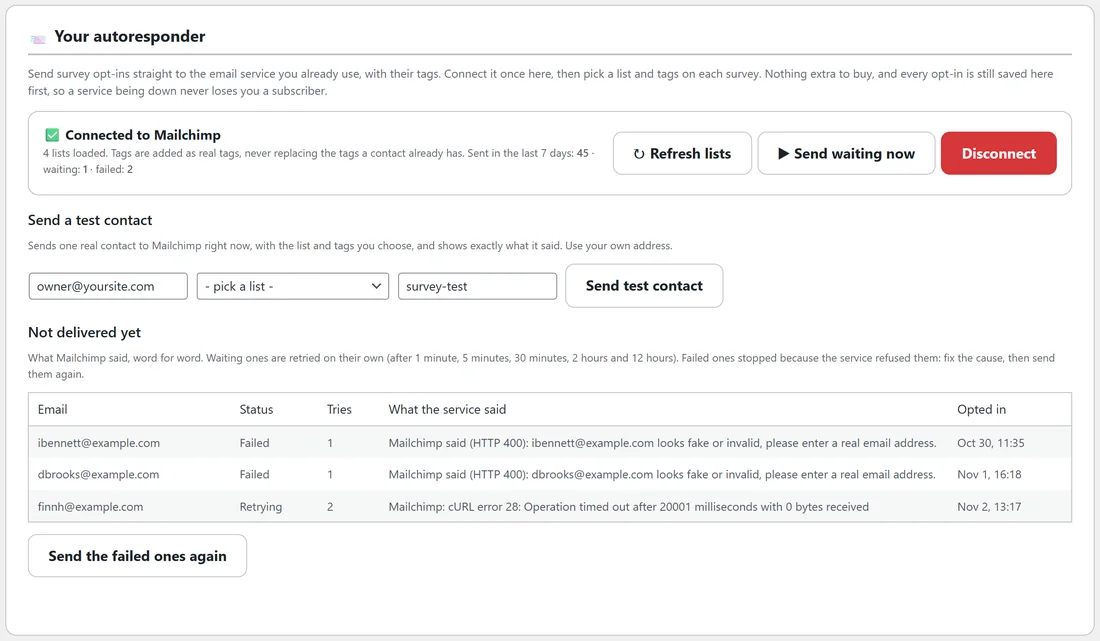
The card shows Sent in the last 7 days, waiting and failed, with three buttons.
- Refresh lists reloads your lists after you create a new one in your service.
- Send waiting now sends anything that is queued right away.
- Disconnect stops sending until you connect again. Click it twice to confirm.
The Diagnostics tab and its support report show the same numbers.
Pick the list and tags on each survey:
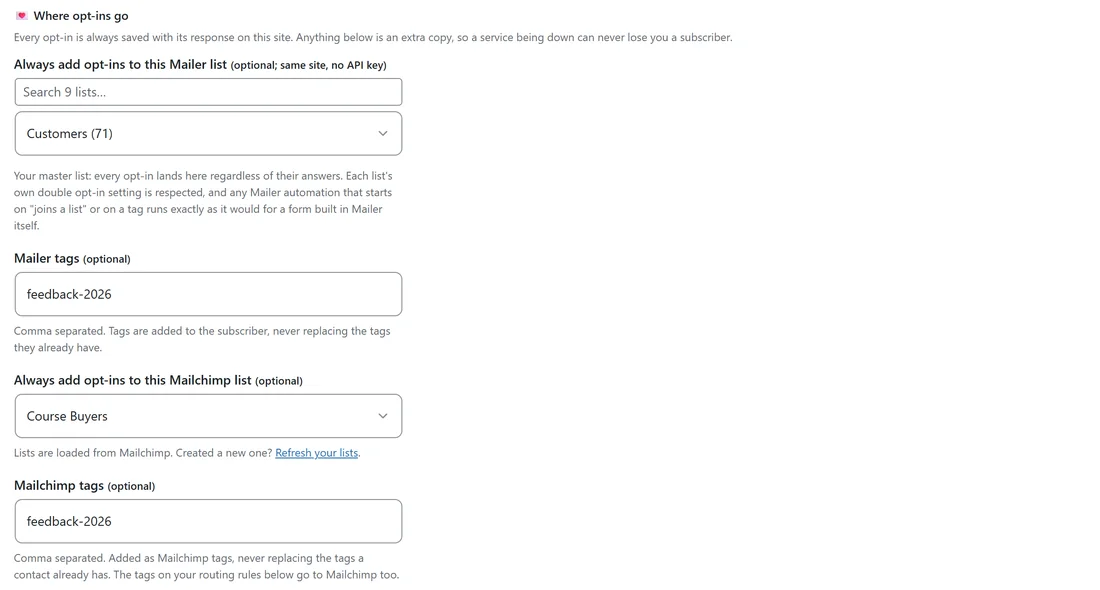
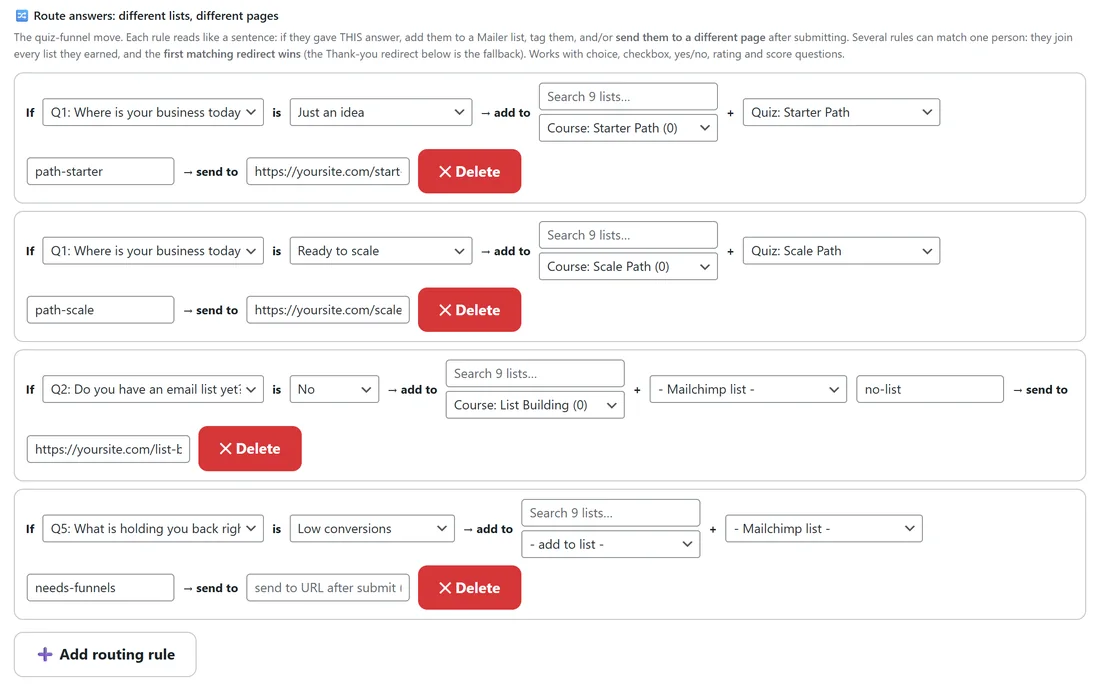
- Open the survey's builder and go to Opt-ins & Routing.
- Under Where opt-ins go, pick Always add opt-ins to this (service) list, for services that have lists.
- Type tags in the (service) tags box, comma separated. The hint under it says how this service handles tags.
- Under Route answers, each rule now has a list picker for your service too. A rule's tags go to your service as well as to Mailer.
- Save.
So "if they answered I run an agency, add them to the Agency list and tag them agency" works the same in Mailchimp or AWeber as it does in Mailer.
Which services need a list:
Mailchimp, GetResponse and the full AWeber connection need a list to put a new contact on. ActiveCampaign and Kit can work from tags alone. Systeme.io and HighLevel have no lists at all, so they work entirely from tags. A survey with no list and no tags picked for your service sends nothing to it. Only opt-ins that include an email address are sent, and they go when the person finishes the survey, not as they answer.
Nothing is ever lost:
Every opt-in is saved with its response on your site first, then sent to your service in the background, so a slow service never slows the survey down.
- If the service is busy or does not answer, the contact waits and is tried again by itself after 1 minute, 5 minutes, 30 minutes, 2 hours and 12 hours. After that it is marked as failed.
- If the service refuses a contact outright, for example an address it thinks is fake, it is not retried, because trying again would not change the answer.
- Under Not delivered yet, each contact is listed with Retrying or Failed, the number of tries, what the service said word for word, and when they opted in.
- Once the cause is sorted, click Send the failed ones again. They are put back in the queue and go out within a minute.
Double opt-in:
Whether a confirmation email goes out is your service's decision. For Mailchimp, the box Send Mailchimp's confirmation email first (double opt-in) on the connection sends it first; it is unticked by default, so people are added straight away. LeadsLeap always sends its own confirmation email.
A real example:
Yoursite Academy connects Mailchimp with its API key. Four audiences load. The feedback survey sends every opt-in to the Course Buyers audience with the tag feedback-2026, and the quiz sends finishers to Yoursite Academy Newsletter, with two routing rules adding the starter and scale audiences. In the last 7 days 45 contacts went out. One is being retried after a time out and two addresses were refused by Mailchimp as invalid, shown with Mailchimp's own words.
What happens to one opt-in, step by step:
- The person sends their answers with their email address.
- The response is stored on your site with the email, so it is safe whatever happens next.
- The plugin works out what this person earned: the survey's always-on list and tags, plus the list and tags of every routing rule their answers matched.
- If that adds up to no list and no tags for your service, nothing is sent to it.
- Otherwise one delivery is written down in the queue, marked waiting, and the visitor sees the thank-you step straight away.
- In the background, the contact is sent to your service: once per list, with the tags each time, so a person routed to two lists is added to both.
- The result is recorded: sent, waiting to try again, or failed with the service's own words.
The full AWeber connection, Mailchimp, ActiveCampaign, Kit, GetResponse, Brevo, Systeme.io, HighLevel, SendFox, LeadsLeap and the HTML form all go through this queue. The simple AWeber connection is the one exception: the visitor's browser sends it to AWeber directly, and the send is counted on the card as sent.
Switching to a different service:
- On Integrations & AI, click Disconnect, then click it again to confirm.
- Pick the new service, fill in its fields and click its Connect button.
- Open each survey's Opt-ins & Routing step and pick the new service's lists, because list ids differ between services. Tags carry over as they are.
- Use Send a test contact.
Opt-ins already sent stay in the old service; nothing is moved between services.
Good tag habits:
- Use one tag per survey for "finished", such as feedback-2026, and one per answer you will act on, such as needs-help.
- Keep tags lowercase with dashes, which every service accepts as they are, apart from GetResponse, which turns dashes into underscores.
- Start your service's automations from those tags, so the right follow up starts the moment the contact arrives.
Tips:
- Use alongside Mailer or WP Sync, or on its own. One opt-in can go to all three.
- After creating a list in your service, click Refresh lists before picking it on a survey.
- If a picked list was removed in your service, the survey shows it as not found. Refresh your lists and pick another.