This guide takes you from nothing to a working webinar with a registration link you can share. It takes about twenty minutes with your own script, and less with AI.
The setup guide across the top of every webinar tracks the steps for you, so you can stop at any point and pick up where you left off.
Before you start:
Open AiX Webinars, then Email, and choose how your emails are sent. Press Send a test email and check it arrives. The private join link only ever reaches people by email, so this comes first. See Choosing How Your Emails Are Sent.
Step 1: Create the webinar:
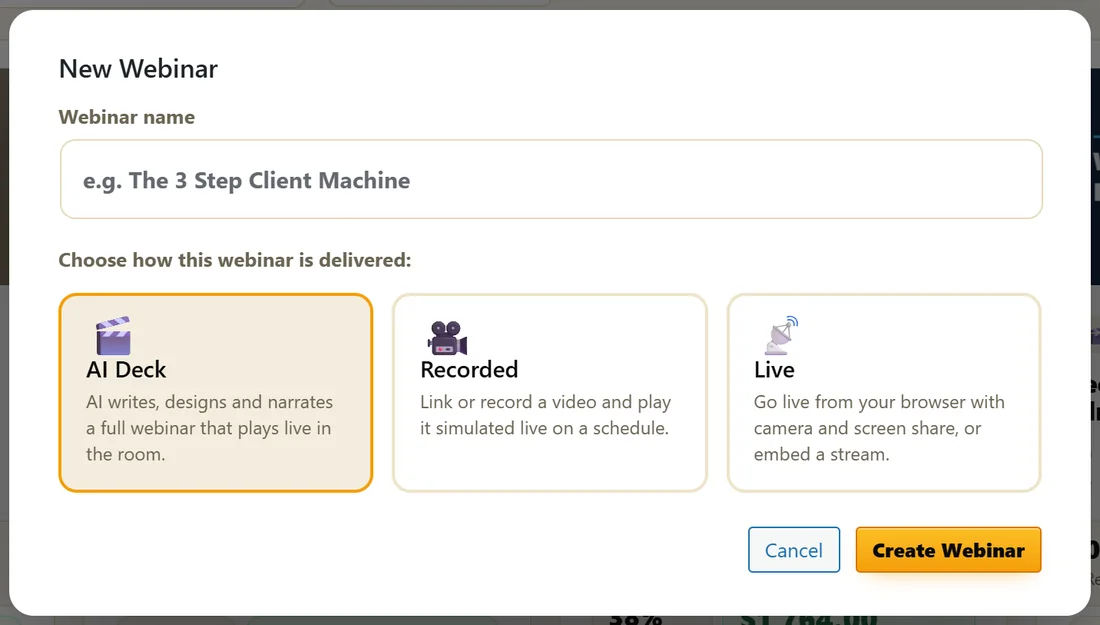
- Open AiX Webinars, then Webinars.
- Click + New Webinar.
- Type a name. This is your private label inside WordPress. You can set a different name for registrants later.
- Pick how it is delivered: AI Deck, Recorded or Live.
- Click Create Webinar. The editor opens on the Content tab.
Step 2: Add your content:
- AI Deck: paste your script into the Script box, one idea per line, and click Build Slides. Then pick a narrator in the Voice panel and click Generate Voiceover.
- Recorded: choose where your video lives, paste the link or pick it from the Media Library, and set the duration.
- Live: choose how you want to broadcast. You go live later from the same tab.
- Click Save Webinar.
Step 3: Set the schedule:
- Open the Schedule tab.
- Pick One-off dates, Recurring weekly, Just in time or On demand.
- Fill in the dates or the pattern and click Save.
Step 4: Write the registration page:
- Open the Registration tab.
- Choose Simple, Advanced or Design My Own.
- Write a headline, a subheadline and three or four bullets, and add the presenter name.
- Click Save. Changes go live on your page as soon as they save, and the Live preview beside the form shows exactly what visitors see.
Step 5: Check the emails:
- Open the Emails tab.
- The Confirmation is already on, with copy written for you. Switch on the reminders and follow ups you want.
- Open any email to edit its subject and body, then click Save.
Step 6: Add your offer (optional):
Open the Offer tab, tick Show a timed offer during the webinar, set when it appears and paste your checkout link. Click Save.
What the setup guide shows:
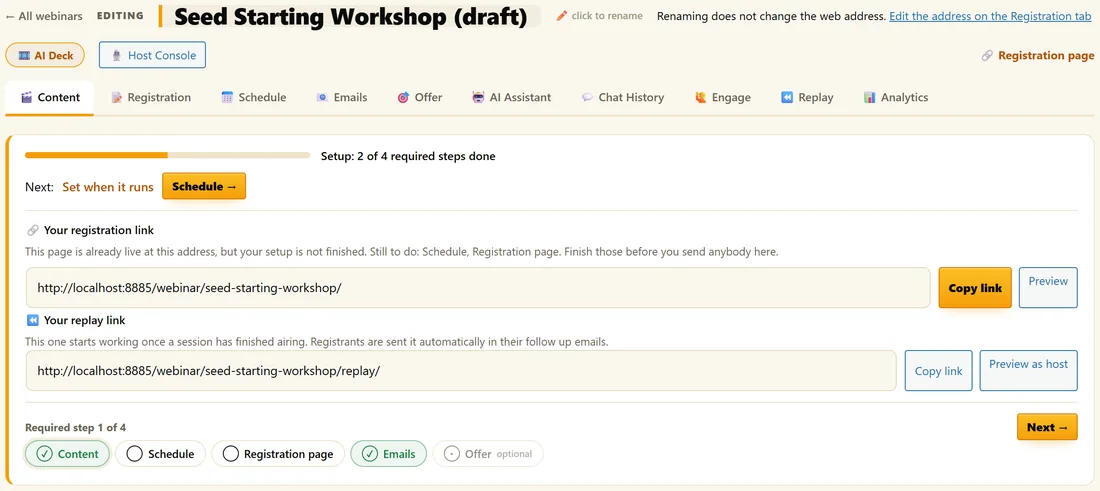
The guide counts the four required steps: Content, Schedule, Registration page and Emails. The Offer step is optional. Next takes you to the step still to do, and Skip for now marks a step as skipped. Your registration link and replay link sit in the guide with Copy and Preview buttons the whole time. When every required step is done the guide shrinks to a single Ready line.
A real example:
Maya creates Seed Starting Workshop as an AI Deck, pastes six lines of script and builds the slides. The guide shows Setup: 2 of 4 required steps done, with Schedule as the next step. She sets one date on the Schedule tab, writes her headline on the Registration tab, and the guide turns green.
Want AI to do the heavy lifting?
On the Content tab of an AI Deck, Write with AI, then Build my whole webinar writes the script, slides, polls, simulated chat, registration copy and emails in one run. See Building A Whole Webinar With AI.
Test it like a visitor:
Open your registration link in a private browser window and sign up with your own email. Check the confirmation arrives, open the join link, and watch a minute of the room. Then share the link.
Which browser to build in:
Build, narrate, record and broadcast in a current desktop Chrome, Edge or Brave. Attendees can watch in any modern browser on any device with nothing to install.
A full first run with the demo business:
Maya sets up her first webinar in one sitting.
- On the Email screen she picks SMTP2GO, enters maya@yoursite.com as the From email and sends a test to herself.
- She clicks + New Webinar, names it Kitchen Garden Plan, picks AI Deck and clicks Create Webinar.
- On the Content tab she clicks Write with AI, fills in her topic, audience and offer, picks 30 min and clicks Generate script. She reads it, changes a few lines, and clicks Build Slides.
- In the Voice panel she picks Heart (US Female) and clicks Generate Voiceover, then Save Webinar.
- On the Schedule tab she picks Recurring weekly, ticks Tuesday, Thursday and Saturday, sets 19:00 and gives Saturday 10:00.
- On the Registration tab she picks Advanced, writes her headline and bullets, adds her photo and logo, and clicks Save.
- On the Emails tab she switches on all three reminders and the four follow ups.
- On the Offer tab she sets the reveal at 23 minutes 20 seconds with her club link.
- The setup guide shows Ready. She copies her registration link and signs up in a private window to test.
Good settings for a first webinar:
- Schedule: Recurring weekly on two or three days, or On demand for a short recorded video
- Registration: Simple with three or four bullets, Ask for first name ticked
- Emails: Confirmation, all three reminders, Follow up: did not show and Follow up: saw the offer
- Replay: on, 72 hours, offer kept on the replay
- Offer: reveal it as your pitch starts, with a 15 minute countdown
Your checklist before sharing the link:
- The test email arrived in your inbox
- The confirmation arrived when you signed up
- The join link opened the room
- The offer appeared at the right minute and its button opened your checkout
- The Registration page looks right on Mobile in the Live preview
What to do next:
- Connect your list in Connecting Your Autoresponder
- Add polls and handouts in Live Polls And Handouts
- Watch the first numbers on the Dashboard and the Analytics tab
Common questions:
How long does a first webinar take?
With a script ready, about twenty minutes to have a working link. With Build my whole webinar, the AI drafts most of it while you wait, and you spend your time reading and polishing.
Can I build now and publish later?
Yes. The registration page is live as soon as the webinar exists, but nobody finds it until you share the link. Keep the link to yourself until the setup guide shows Ready.