Beyond the marketplaces, checkout platforms fall into two groups. Paste and go platforms fill tokens into the webhook URL you give them, so one URL covers every sale. JSON only platforms cannot fill tokens into a URL, so they need the Stripe Connect add-on or the sale pixel on a thank you page you control.
Where To Find It:
Click 🔌 Connections, then 🎯 Tracking Setup, and open a platform under 🔗 Platform-Specific Setup. Each card has Copy paste this URL with your site address in it, Where to paste it, a Tokens reference and a Common gotcha.
The Click ID Is Added For You:
When a tracking link's destination is on one of these platforms, the tracker adds the click ID in the parameter that platform carries through checkout:
- Digistore24: ?custom= with the click ID.
- PayKickstart: ?tid= with the click ID.
- ThriveCart: ?passthrough= with the click ID.
For any other cart, put {wct_click_id} or {click_id} in the destination URL and the tracker swaps in the real click ID at the moment of the click.
Digistore24:
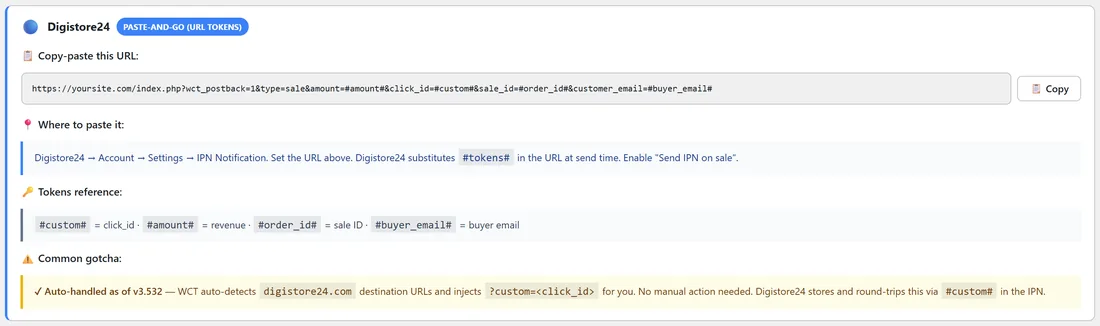
- Go to Account, then Settings, then IPN Notification.
- Paste this URL with the tokens exactly as they are: yoursite.com/index.php?wct_postback=1&type=sale&amount=#amount#&click_id=#custom#&sale_id=#order_id#&customer_email=#buyer_email#
- Enable Send IPN on sale and save.
Digistore24 fills in the #tokens# when it sends: #custom# is the click ID, #amount# the revenue, #order_id# the sale ID and #buyer_email# the buyer's email.
PayKickstart For Your Own Products:
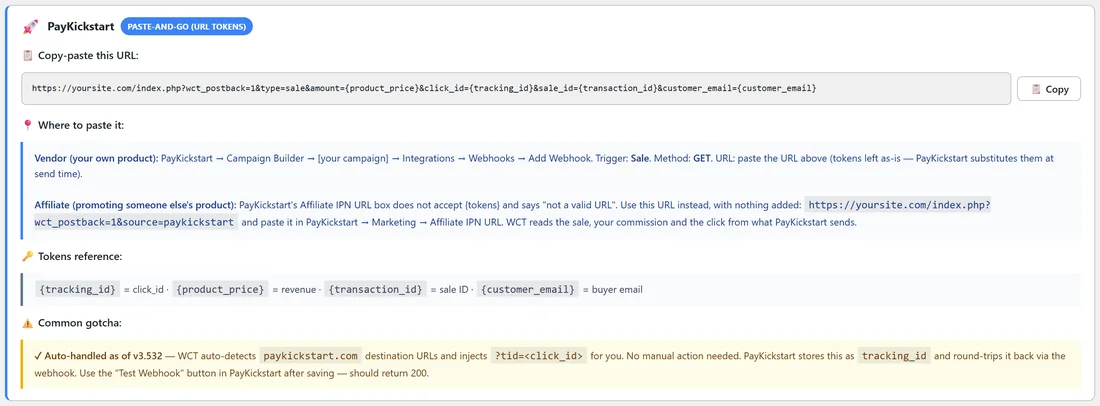
- Go to Campaign Builder, open your campaign, then Integrations, then Webhooks, then Add Webhook.
- Set the trigger to Sale and the method to GET.
- Paste: yoursite.com/index.php?wct_postback=1&type=sale&amount={product_price}&click_id={tracking_id}&sale_id={transaction_id}&customer_email={customer_email}
- Save and use Test Webhook to check for a 200 response.
PayKickstart As An Affiliate:
PayKickstart's Affiliate IPN URL box does not accept tokens. Paste yoursite.com/index.php?wct_postback=1&source=paykickstart with nothing added, in Marketing, then Affiliate IPN URL. The tracker reads the sale, your commission and the click from what PayKickstart sends.
ThriveCart:
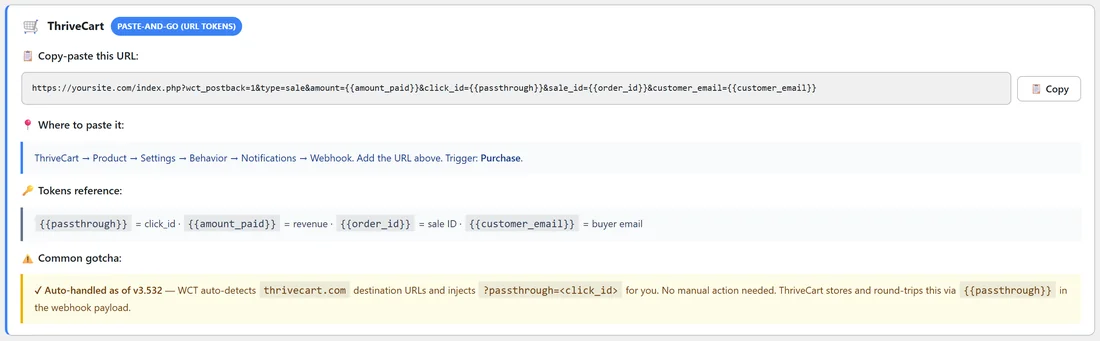
- Go to the product, then Settings, then Behavior, then Notifications, then Webhook.
- Paste: yoursite.com/index.php?wct_postback=1&type=sale&amount={{amount_paid}}&click_id={{passthrough}}&sale_id={{order_id}}&customer_email={{customer_email}}
- Set the trigger to Purchase and save.
Stripe:

Stripe sends JSON webhooks such as checkout.session.completed, so a copy and paste URL cannot work. The recommended route is the Stripe Connect add-on, which receives Stripe's webhooks directly. See Stripe Connect Add-On For Native Stripe Sales. Without the add-on, the Stripe card describes the pixel route:
- When your site creates the Stripe Checkout session, set client_reference_id to the visitor's click ID.
- Set the success_url to a thank you page on your WordPress site with ?wct_click_id={CLIENT_REFERENCE_ID} added.
- Put the sale pixel from Method 2 on that page.
SamCart:
SamCart's custom webhooks send JSON and do not fill in URL tokens.
- Use SamCart's Confirmation Page, External URL setting to send buyers to a thank you page on your WordPress site, carrying the click ID as ?wct_click_id=.
- Put the sale pixel on that page.
Gumroad:
Gumroad's URL pings post fixed fields and do not fill in tokens.
- Add ?wct_click_id={wct_click_id} to your Gumroad product link in the tracking link's Destination URL. The tracker swaps in the real click ID, so it stays with the buyer's Gumroad session.
- Send buyers to a thank you page on your site after purchase, carrying the click ID.
- Put the sale pixel on that page.
Your Platform Is Not Listed:
If the platform can call a URL you choose and fill in the amount and a passthrough value, use the postback URL. If it can only send JSON, use the sale pixel on your own thank you page. See Server To Server Postback URLs.
A Real Example:
yoursite.com sells the Email Swipe Pack on a ThriveCart checkout. The tracking link swipe-pack points at the checkout page, so every visitor arrives with ?passthrough= and their click ID. The ThriveCart webhook sends the amount paid, the passthrough value, the order ID and the buyer's email, and each sale shows on Conversions with the email or blog Sub-ID that sent the buyer.
Tips:
- Keep the tokens exactly as the card shows them. Each platform uses its own brackets.
- Test with the platform's own test button first, then with one real or sandbox purchase.