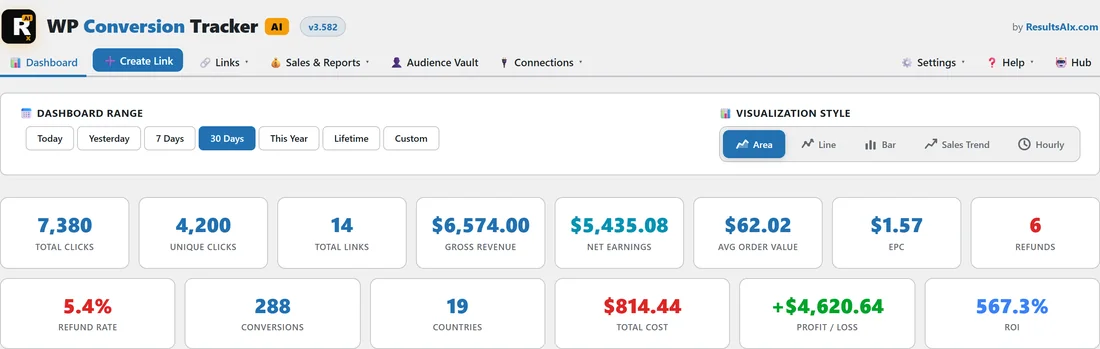
WP Conversion Tracker AI is a link tracker that runs inside your own WordPress site. It records clicks, leads, sales and revenue in your own database, so no outside tracking service sits in the middle and all of the data stays yours.
You use it to answer one question: which links, emails, ads and partners actually bring in leads and money? Every number in the plugin comes from the clicks and sales your own site recorded.
What The Plugin Does:
Every tracking link you create is a short address on your own domain, for example yoursite.com/inbox-course. When somebody clicks it, the plugin:
- Records the click, with the time, the country, the device, the page that sent the visitor and any Sub-ID you added to the link.
- Gives the click its own number, the click ID, and stores it in a cookie in the visitor's browser.
- Adds wct_click_id=123 (the real number) to the end of the destination address, then sends the visitor on.
- Waits. When that person later opts in or buys, a pixel on your thank you page or a message from your payment platform brings the click ID back, and the plugin joins the lead or sale to the original click.
That is the whole idea. Everything else, the Dashboard, the reports, the add-ons, is built on top of that click ID.
The Four Step Tracking Flow:
- Create a tracking link. Click ➕ Create Link in the menu, give the link a name, a short slug and the page it should send people to.
- Send traffic to the tracking link, never to the destination directly. That way the click ID is set before the visitor reaches your funnel.
- Connect the conversion. Put the lead or sale pixel on your thank you page, or paste the postback URL into your payment platform, so leads and sales come back to the plugin.
- Read the results on the 📊 Dashboard, the 🔗 All Links list or the Stats page of any single link.
Key Terms You Will See Everywhere:
- Click ID: the unique number given to each click. It is what joins a click to its lead or sale.
- Lead, also called Conversion A: a conversion with no money attached, such as an opt-in, a webinar registration or a free trial.
- Sale, also called Conversion B: a conversion with revenue above zero, such as a purchase or a subscription payment.
- Sub-ID: an extra label on the end of a link, such as /facebook or /email-oct06, so one link can report on many traffic sources.
- Postback: a message sent from your payment platform's server straight to your site when a sale happens. No browser is involved, so nothing can block it.
- Pixel: a small snippet on a page, usually your thank you page, that reports a lead or sale from the visitor's browser.
- Gross and Net: Gross is what the customer paid. Net is what you keep after platform fees and affiliate commissions, with refunds taken off.
Where Everything Lives:


The plugin adds one menu to WordPress called WPC Tracker. On the Plugins screen it is listed as WP Conversion Tracker AI. Inside, a single menu bar runs across the top of every screen:
- 📊 Dashboard: the overview of every link, with stat cards, charts and the latest clicks and conversions.
- ➕ Create Link: the form for a new tracking link.
- 🔗 Links: a menu holding 🔗 All Links and 📁 Folders, plus the screens add-ons place here, such as 🔄 Rotators, 🧪 Split Tests, 📱 QR Codes and 📥 Import CSV.
- 💰 Sales & Reports: the 💰 Conversions list, plus the Pro Tools reports 📊 Traffic Quality, 🤖 AI Analyst and 🛡️ IP Activity Log when they are installed.
- 👤 Audience Vault: the visitor identity add-on, when installed.
- 🔌 Connections: 🎯 Tracking Setup, where your pixels and postback URLs live, plus 🏪 W+ Connect, 🛒 JVZ Connect and 💳 Stripe Connect when those add-ons are installed.
- ⚙️ Settings: the ⚙️ Settings and 🩺 Diagnostics screens.
- ❓ Help: 📚 Training, 🔗 Resources and 💬 Support, which opens in a new tab.
- 🤖 Hub: the ResultsAiX product hub.
Add-ons you have not installed appear as small locked entries, for example 🔒 Pro Tools, so you can see what each one adds.
A Real Example:
Say yoursite.com sells an online course and gives away a free starter guide. You create a link called Free Starter Guide opt-in with the slug starter-guide and the destination yoursite.com/free-starter-guide/. In your Tuesday newsletter you use yoursite.com/starter-guide/email-oct06, and on Facebook you use yoursite.com/starter-guide/fb-group. The lead pixel sits on the guide's thank you page. A week later the link's Stats page shows how many people clicked from each place, how many opted in, and which source brought the most leads per click.
A Quick First Test:
- Create a link with ➕ Create Link.
- Open a private or incognito browser window and visit the tracking link.
- Check the address bar on the destination page. You should see ?wct_click_id= followed by a number.
- Open a page that carries the lead pixel in the same window.
- Refresh the 📊 Dashboard. The click and the lead are there.
How The Numbers Fit Together:
Every report in the plugin builds on the same chain, so it helps to read them in order:
- Clicks: every visit through a tracking link.
- Unique clicks: the same, counted once per IP address.
- Leads: opt-ins and other conversions with no money.
- Sales: paid conversions, with fully refunded ones taken out.
- Gross and Net: what customers paid, and what you kept.
- EPC: earnings per click, the single best number for comparing traffic sources.
If clicks are high and leads are low, look at the landing page. If leads are high and sales are low, look at the offer and the follow up emails.
Your First Hour Checklist:
- Activate your licence and run the Setup Wizard.
- Click 🛡️ Block My Own IP in Settings.
- Create one link for each offer you promote this month.
- Add the lead pixel to each opt-in thank you page.
- Connect your sales platform with its postback or notification URL.
- Make one test click and one test conversion in a private window.
- Share your links, with a Sub-ID for each place you post them.
Tips:
- Click ⚙️ Settings, then 🛡️ Block My Own IP on day one, so your own testing does not fill your reports.
- Run the Setup Wizard if you sell on WarriorPlus or JVZoo, because it hands you every URL with a Copy button. See Setup Wizard Walkthrough.
- Next, read Creating And Managing Tracking Links, then Conversion Tracking Setup Choices to pick the right way to report leads and sales.