Split testing is part of the Pro Tools add-on. It lets one tracking link send traffic to two or more pages and measures which one actually earns, so you decide on sales and money rather than clicks.
Where To Find It:
- Tests are created from a link: click 🔗 Links, then 🔗 All Links, and click 🧪 A/B Test on the link you want to test.
- Every test is listed on 🔗 Links, then 🧪 Split Tests.
Creating A Test Step By Step:
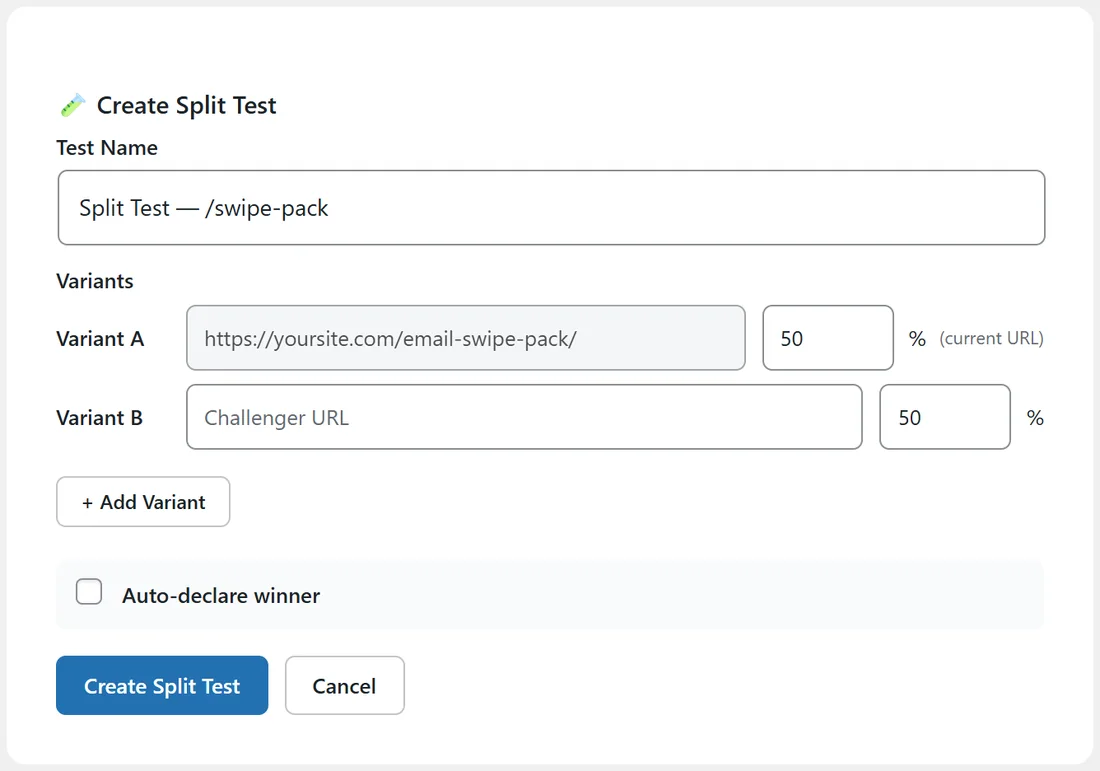
- Click 🧪 A/B Test on the link's row. The 🧪 Create Split Test form opens.
- Test Name: your own label. It starts as Split Test followed by the slug, for example Split Test, /swipe-pack.
- Variants: Variant A is the link's current URL, shown greyed out. Type the Challenger URL for Variant B.
- Set each variant's % weight. A new test starts at 50 and 50. A higher weight sends that variant a larger share of the traffic.
- Click + Add Variant for a test with three or more pages.
- Tick Auto-declare winner if you want the plugin to end the test for you, then set the two options below.
- Click Create Split Test.
The Auto-Declare Options:
- Declare winner after conversions on: Any Variant, Variant A (Original) or Variant B (Challenger).
- Min conversions to trigger: how many conversions are needed before a winner is declared, so one lucky early sale cannot end the test. It is set to 100 by default and cannot go below 5.
Leave Auto-declare winner unticked to run the test until you decide yourself.
How The Leader Is Chosen:
While a test runs, the leading variant is the one with the best sales conversion rate, sales divided by clicks. If no variant has a sale yet, it uses the rate of all conversions, so a lead test still shows a leader. Variants with fewer than ten clicks are left out, so one click cannot look like a 100 percent rate. The leader carries a Leading badge. Once a winner is declared, all traffic goes to it.
What Each Variant Shows:
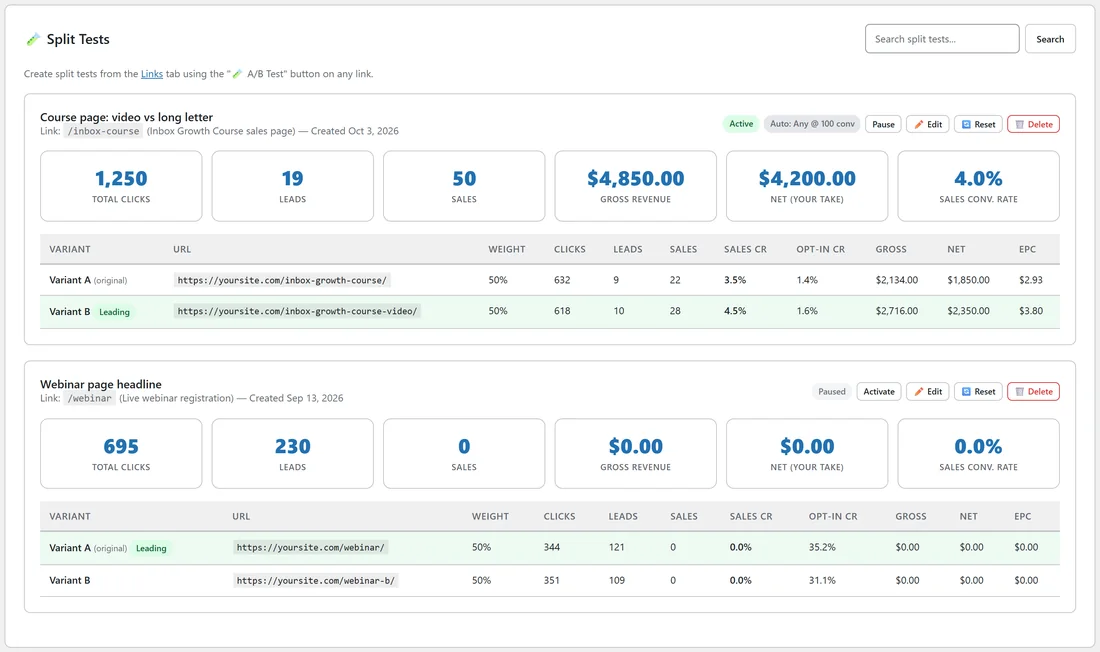
Every variant row lists URL, Weight, Clicks, Leads, Sales, Sales CR, Opt-in CR, Gross, Net and EPC, so you compare money as well as clicks. Each test's card also shows Total Clicks, Leads, Sales, Gross Revenue, Net (Your Take) and Sales Conv. Rate. A visitor keeps seeing the same variant for 30 days through a browser cookie, and a conversion counts for that variant when it is reported from a browser that still holds the cookie, which is how pixel conversions work.
Managing Tests:
Each test card shows its link, when it was made, Active or Paused, and its auto-declare rule, such as Auto: Any @ 100 conv. The buttons are:
- Pause and Activate.
- ✏️ Edit. Changing a weight keeps the variant's numbers. Changing a variant's URL resets that one variant, because it is a new page.
- 🔄 Reset, to start the numbers again from zero after you change a page mid test.
- 🗑️ Delete.
A Search box finds a test by name.
A Real Example:
yoursite.com tests its course sales page. Variant A is the long sales letter and Variant B is a video page. After about 600 clicks each, Variant B shows 28 sales against 22 and a higher EPC, and it carries the Leading badge. Auto-declare is set to Any Variant at 100 conversions, so the test keeps running until it has enough data to end itself.
Running A Test That Tells You Something:
- Change one thing at a time, such as the headline or the offer, not both.
- Set Min conversions high enough that the result is not noise.
- Let it run through a full week if your traffic changes by day.
- Judge on sales conversion rate and EPC rather than clicks.
- When a winner is declared, point the link at the winning page and start the next test.
Tips:
- Geo Targeting runs before a split test, so country rules decide first and the test then picks the variant. See Geo Targeting With Pro Tools.
- For sales reported by marketplaces, compare variants on the link's Stats page too.