💰 Conversions is your ledger. Every lead and every sale the tracker has recorded appears here in one list, whichever link produced it.
Where To Find It:
Click 💰 Sales & Reports, then 💰 Conversions.
The Summary Tiles:

Across the top: Total Conversions, Leads, Sales, Customer Spend, Your Net Take and Avg Sale. With Pro Tools you also see Total Cost, Profit / Loss and ROI. Customer Spend is what buyers paid. Your Net Take is what you keep after the platform's fee and any affiliate commission. Keeping the two apart matters on marketplace sales, where they are rarely the same, and it means the tiles agree with the rows below. The tiles follow your filters.
Searching:
Type into Search to find a lead or sale by email, product, sale ID or IP address, so you can find a particular customer's purchase without knowing which link they came through.
Filtering Step By Step:

- Type: All, Leads Only or Sales Only.
- Link: All Links or one tracking link.
- Date Range: All Time, Today, Yesterday, Last 7 Days, Last 30 Days, This Year or Custom Range, which shows From and To dates.
- Country: a two letter country code, such as US, GB or CA.
- Min $ Revenue: hide everything below an amount, useful for separating main sales from upsells.
- Click Apply Filters, or Reset to go back to everything.
The Columns:
Date, Link, Sub ID, Type, Revenue, Sale ID, Product, Full Name, Email, Affiliate, Source, Gateway, Traffic Source, Recurring, Attr, IP, Country and Meta, plus a delete button on each row. Click ⚙️ Columns to choose which to show. Revenue shows your net take, with the customer price underneath when they differ. The Sub ID column ties each conversion to the place you shared the link. Where the Audience Vault has already identified a buyer, the Full Name and Email columns are filled in and marked with a small 🛡️ shield, which is handy on affiliate sales where the marketplace hides buyer details.
Badges You Will See:
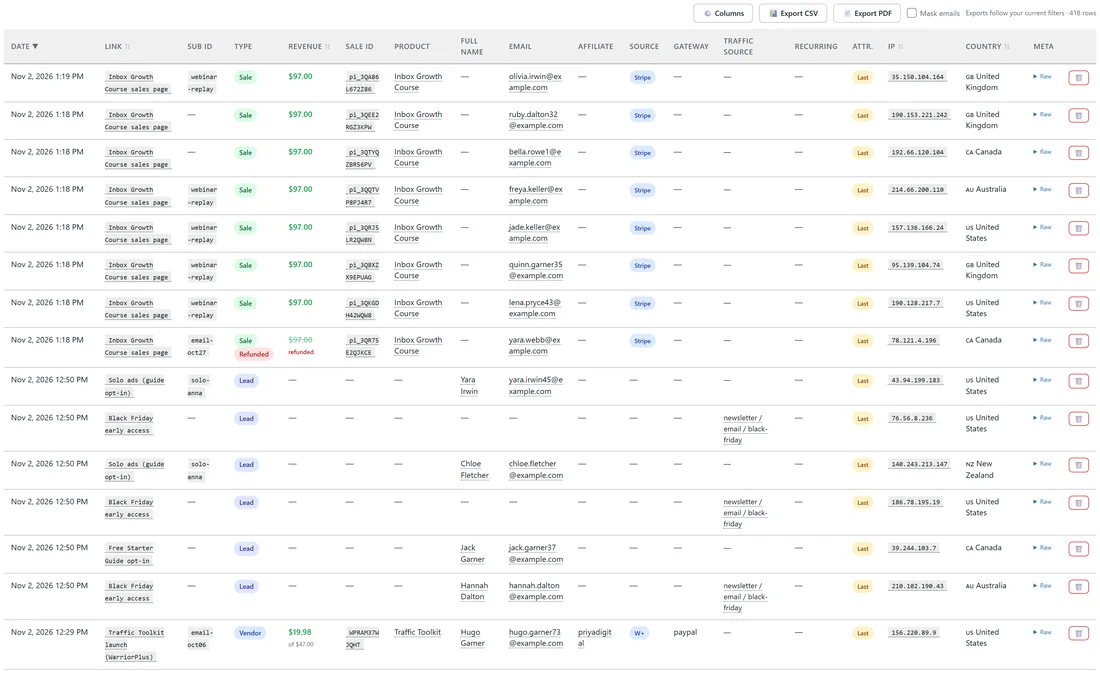
- Sale or Lead in the Type column, and Vendor or Affiliate on marketplace sales.
- A red Refunded badge with the amount struck through on a fully refunded sale. It stays in your history but no longer counts.
- An amber Partial refund badge with the amount returned.
- A purple ↻ Re-attr badge when Smart IPN Re-attribution moved a sale to a more recent click. Hover it to see the audit. See Smart IPN Re-Attribution.
Each row's delete button asks you to confirm first.
Exporting:
Above the table:
- 📊 Export CSV: every column plus the raw details, with no row limit.
- 📄 Export PDF: a printable report in a new tab, saved through your browser's print window.
- Mask emails: tick it to hide most of each buyer's email, for example j*****@example.com, in both exports.
Exports follow your current filters, so what you see is what you get. See Exporting Your Data.
A Real Example:
The owner of yoursite.com wants last month's course buyers. They set Type to Sales Only, Link to Inbox Growth Course sales page and Date Range to Last 30 Days, then click Apply Filters. Customer Spend and Your Net Take update at once, the list shows each buyer with the Sub-ID that sent them, and Export CSV hands the list to a spreadsheet for a thank you email.
Finding One Customer Step By Step:
- Type part of their email into Search and click Apply Filters.
- Read each row: the link and Sub-ID that brought them, the product, the amount and the gateway.
- Hover any badge for details, such as the amount returned on a partial refund.
- With the Audience Vault, open the person in 👤 Audience Vault for their full journey.
Tips:
- Switch to Leads Only over the same range to check that opt-ins keep pace with sales.
- Add Min $ Revenue to separate high value purchases.
- For one link only, the same table appears on that link's Stats page.