Tracking links are the heart of WP Conversion Tracker AI. You make them with ➕ Create Link and you look after them on the 🔗 All Links list. Each link is a short address on your own domain that records the click and then sends the visitor to the page you chose.
Where To Find It:
- Click ➕ Create Link in the menu bar to make a new link.
- Click 🔗 Links, then 🔗 All Links, to see and manage every link.
Creating A Link Step By Step:
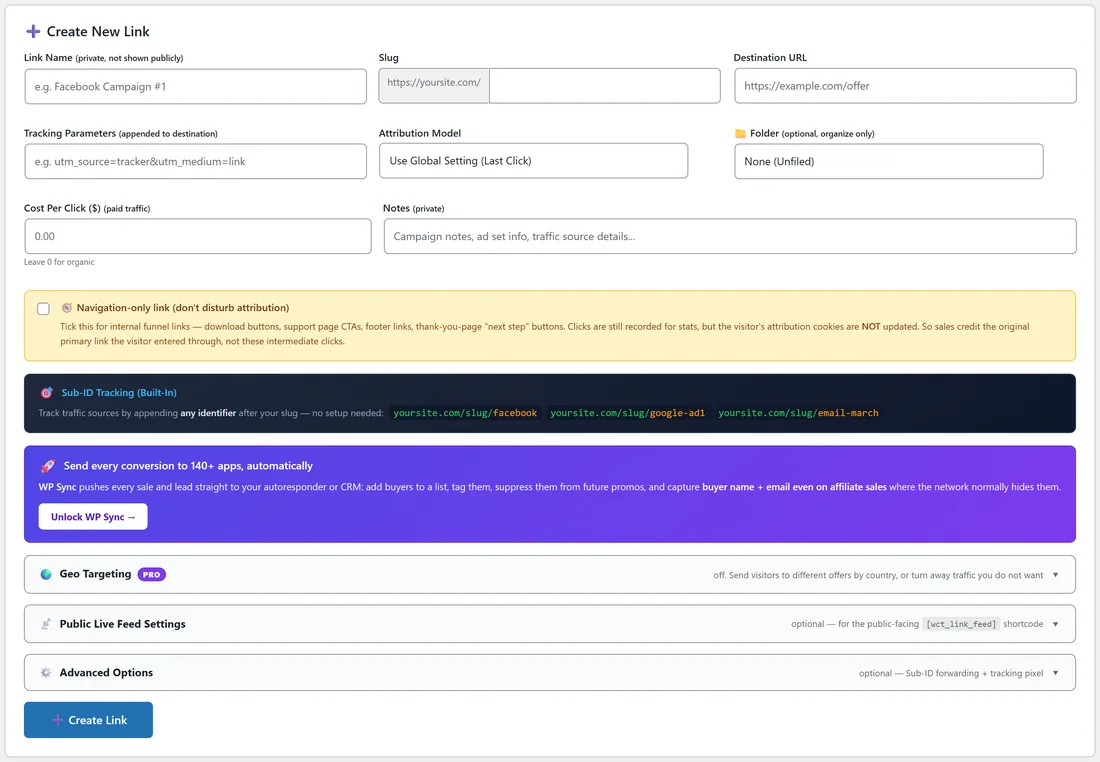
- Click ➕ Create Link.
- Type a Link Name, for example Inbox Growth Course sales page. Only you see it.
- Type a Slug, for example inbox-course. The grey box in front of it shows your site address, so you can see the full tracking link: yoursite.com/inbox-course.
- Paste the Destination URL, the real page people should land on, for example https://yoursite.com/inbox-growth-course/.
- Fill in any optional fields described below.
- Click ➕ Create Link. The All Links list opens with your new link at the top.
Every Field On The Form:
- Link Name (private, not shown publicly): your own label. Use something you will recognise in six months, such as the campaign and the offer.
- Slug: the short path after your domain. Use lowercase letters, numbers and dashes. Short and memorable works best.
- Destination URL: where visitors go. Any full address works, including affiliate links and checkout pages.
- Tracking Parameters (appended to destination): optional extra text added to the destination every time, for example utm_source=youtube&utm_medium=video.
- Attribution Model: Use Global Setting, Last Click or First Click for this one link. See Attribution Models And Navigation-Only Links.
- 📁 Folder (optional, organize only): file the link in a folder, or choose + Create new folder... and type a name. Folders never change tracking. See Organizing Links With Folders.
- Cost Per Click ($) (paid traffic) and Notes (private): these appear when the Pro Tools add-on is installed. See Cost Per Click And Profit Tracking With Pro Tools.
- 🧭 Navigation-only link (don't disturb attribution): tick it for in-funnel buttons such as download links. Clicks are still counted, but they never take the credit for a sale.
The dark 🎯 Sub-ID Tracking (Built-In) box reminds you that any word after the slug, such as /facebook, becomes a Sub-ID with no setup.
The Fold-Out Panels:
Three panels sit below the main fields. Click a panel's title bar to open it.
- 🌍 Geo Targeting PRO: country rules, when Pro Tools is installed. See Geo Targeting With Pro Tools.
- 📡 Public Live Feed Settings: Feed Title, Feed Description, a Feed Image chosen with Choose Image, and the Do NOT show in Public Feed box. A link only shows in your public feed when it has a Feed Title and that box is not ticked. See Public Link Feed And Shortcode.
- ⚙️ Advanced Options: 🔀 Forward Sub-ID to Destination URL, the Pass UTM tags and other parameters to the destination page box, and Tracking Pixel / Code (optional, fires on click) for a third party pixel. See Forwarding Sub-IDs To The Destination URL and UTM Tags And Custom Parameters.
The All Links List:
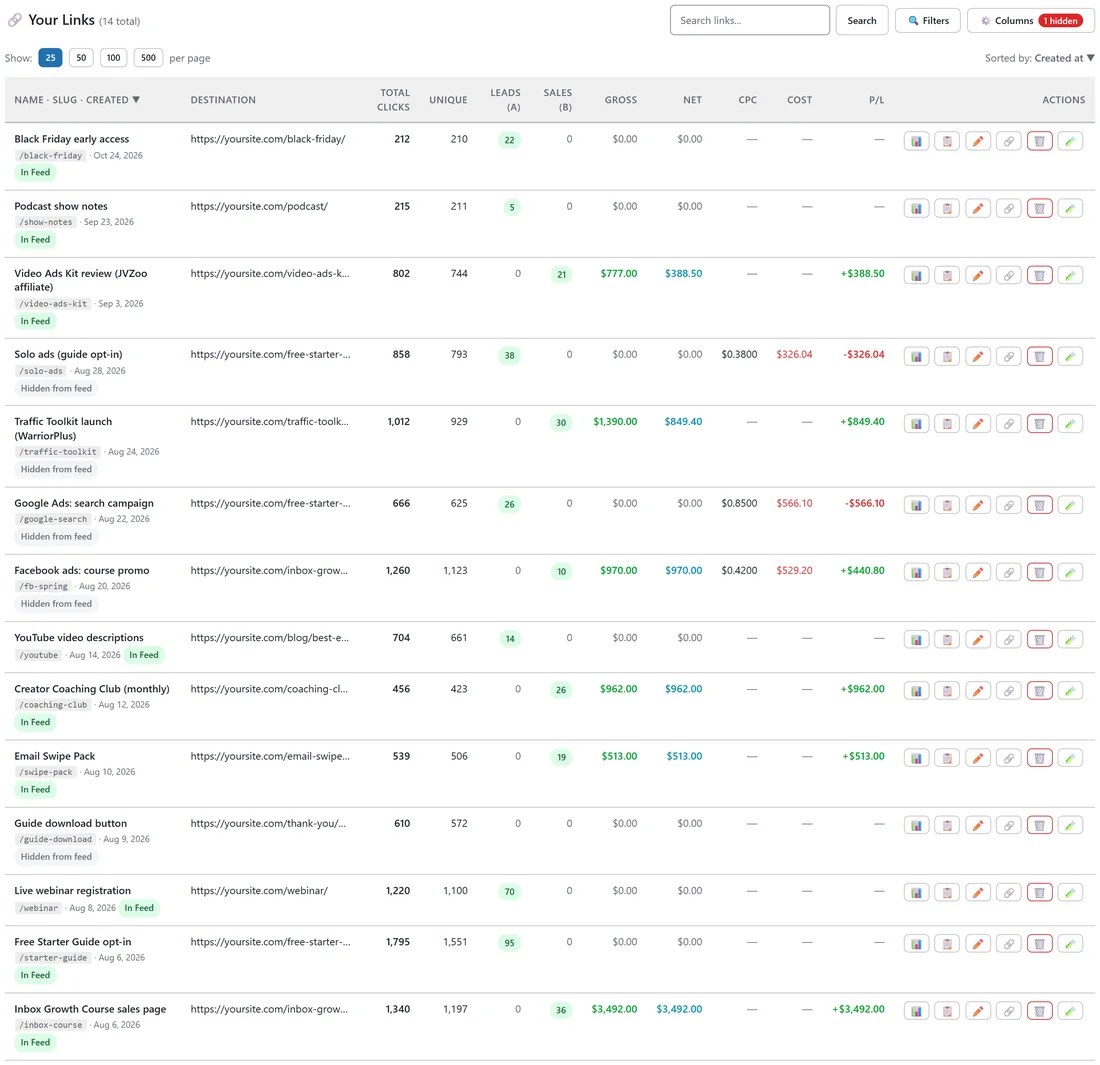
Each row is one link. The first column shows the name, the slug, the date it was made and a feed badge, In Feed or Hidden from feed. The other columns are:
- Destination: where the link sends people. Hover it to see the full address.
- Total Clicks: every click, repeat visits included.
- Unique: clicks from different IP addresses.
- Leads (A): conversions with no revenue.
- Sales (B): paid sales, not counting fully refunded ones.
- Gross: what customers paid on this link, with refunds taken off.
- Net: what you kept after fees and affiliate commissions, with refunds taken off.
- Quality: the share of clicks that came from a real browser. With Pro Tools, click the value to open the Traffic Quality report for that link.
- CPC, Cost and P/L: with Pro Tools, your cost per click, total cost and profit or loss.
- Actions: 📊 Stats, 📋 Copy Link, ✏️ Edit, 🔗 Preview, which opens the tracking link in a new tab, and 🗑️ Delete. Add-ons can add their own buttons here, for example 🧪 A/B Test from Pro Tools.
Searching, Sorting And Paging:
- Type in Search links... and click Search. It looks in the link name, slug, destination URL and feed title.
- Click a column heading to sort by it. The line above the table shows the current order, for example Sorted by: Created at ▼.
- Use Show: 25, 50, 100 or 500 per page.
Filtering The List:
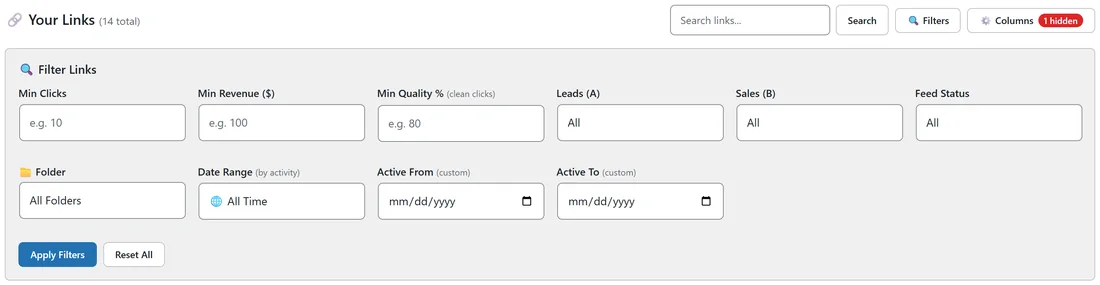
Click 🔍 Filters to open Filter Links.
- Min Clicks, Min Revenue ($) and Min Quality % (clean clicks).
- Leads (A): All, Has Leads or No Leads. Sales (B): All, Has Sales or No Sales.
- Feed Status: All, In Feed or Hidden.
- 📁 Folder: All Folders, Unfiled (no folder) or any folder you made.
- Date Range (by activity): All Time, Today, Yesterday, This Week, Last 7 Days, This Month, Last Month or This Year, or your own Active From and Active To dates. This shows links that had a click or a sale in that period, not links created then.
Click Apply Filters to run them, or Reset All to clear them.
Choosing Columns:
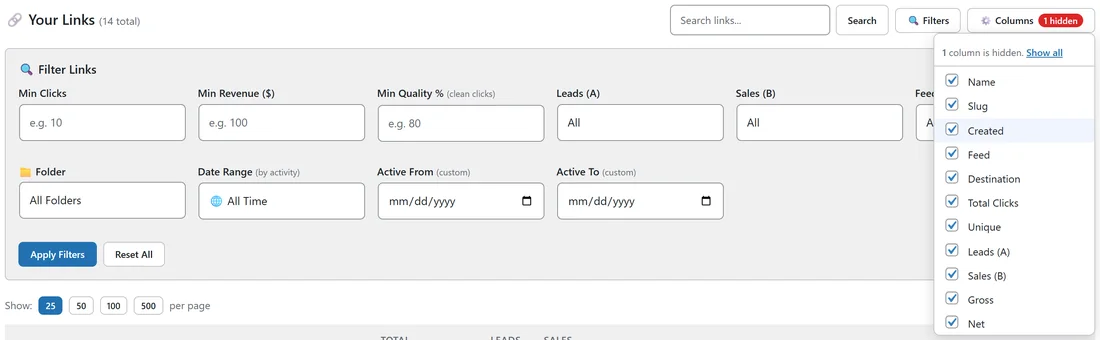
Click ⚙️ Columns and untick any column you do not need. While a column is hidden, the button shows a red count such as 1 hidden, and the list offers Show all to bring everything back. Your choice is remembered in this browser.
A Real Example:
The owner of yoursite.com sorts the list by Net to see which links earn the most, then filters Sales (B) to No Sales and Min Clicks to 500. Solo ads (guide opt-in) and Google Ads: search campaign appear. Both are lead links, which is expected, so the owner opens their 📊 Stats pages to compare leads per click by Sub-ID instead.
One Link Per Offer, One Sub-ID Per Place:
The cleanest setup is one tracking link for each offer or page, and a Sub-ID for each place you share it. For yoursite.com that means one inbox-course link, shared as /email-oct06 in the newsletter, /fb-feed in ads and /blog-post on the blog. Every source then appears as its own row in the link's Sub ID Breakdown, while the link's totals show the whole picture. Create a separate link only when something about the link itself differs, such as a different destination, a different cost per click or a different attribution model.
Naming Links So They Stay Useful:
- Start with the offer or page, then the channel: Inbox Growth Course sales page, Facebook ads: course promo.
- Keep slugs short and readable aloud, for example webinar rather than live-webinar-registration-page-2026.
- Use Notes, with Pro Tools, for details such as the audience or the ad set.
Tips:
- Always share the tracking link, never the raw destination, so every click is counted.
- To change a link later, see Editing Links Safely.
- Deleting a link removes the link and every click and conversion recorded on it, and the plugin asks you to confirm first.