Amazon SES is the best value way to send real volume, and it is where most growing lists end up. It also takes the most setup of any service on the Sending screen, because Amazon talks in words like identity, sandbox and region. This guide walks through it in order, in plain English.
Set aside about thirty minutes. Two steps involve waiting: DNS records take a little while to spread, and Amazon reviews your request for production access, usually within a day.
What you need before you start:
- An AWS account (you sign up on the AWS website at amazon.com).
- Access to the DNS for your sending domain, for example yoursite.com.
- About thirty minutes, plus a day of waiting for production access.
Where to find it:
In ResultsAiX Mailer open Delivery, then Sending, then click + Add Sender and choose Amazon SES in the Provider dropdown. A seven step checklist for SES appears right in the form, with Open links to the matching AWS pages.
Step 1. Choose one region and stay in it:
Sign in to the AWS console and open Amazon SES. The region selector sits at the top right of the console. Pick the region nearest most of your subscribers, and note its code, such as us-east-1 or eu-west-1.
Every region is a separate SES. A domain you verify in one region does not exist in another, so do every step below in this same region.
Step 2. Verify your domain:
- In SES, open Verified identities and choose Create identity.
- Choose Domain and type the domain you send from, for example yoursite.com.
- Keep Easy DKIM switched on. AWS shows three CNAME records.
- Add those three records at your DNS host.
- Wait for the identity to show as verified.
Verify the whole domain rather than a single address. Then any address on it can send, and every email is DKIM signed, which is one of the biggest things inboxes look at.
Step 3. Request production access:
Every new SES account starts in the sandbox, where it can only email addresses you have verified yourself, with a small daily quota.
- In SES, open the Account dashboard and choose Request production access.
- Describe what you send, that people join through a form on your site, and that every email has a one-click unsubscribe, which the Mailer adds for you.
- Wait for Amazon's reply, usually within a day.
Step 4. Create an access key for sending:
This connection signs each request with an AWS access key: an access key ID and a secret access key.
- In the AWS console, open IAM and create a user just for sending, for example leafwise-mailer.
- Give it permission to send email through SES and nothing more.
- Create an access key for that user and copy both parts straight away. The secret is shown only once.
These keys are not your AWS console password. If you created SES SMTP credentials instead, use them with Bring-your-own SMTP and the SES SMTP endpoint shown on the SES SMTP settings page, because an SMTP password is not the same thing as a secret access key. See Connect Your Own SMTP Server.
Step 5. Fill in the form:
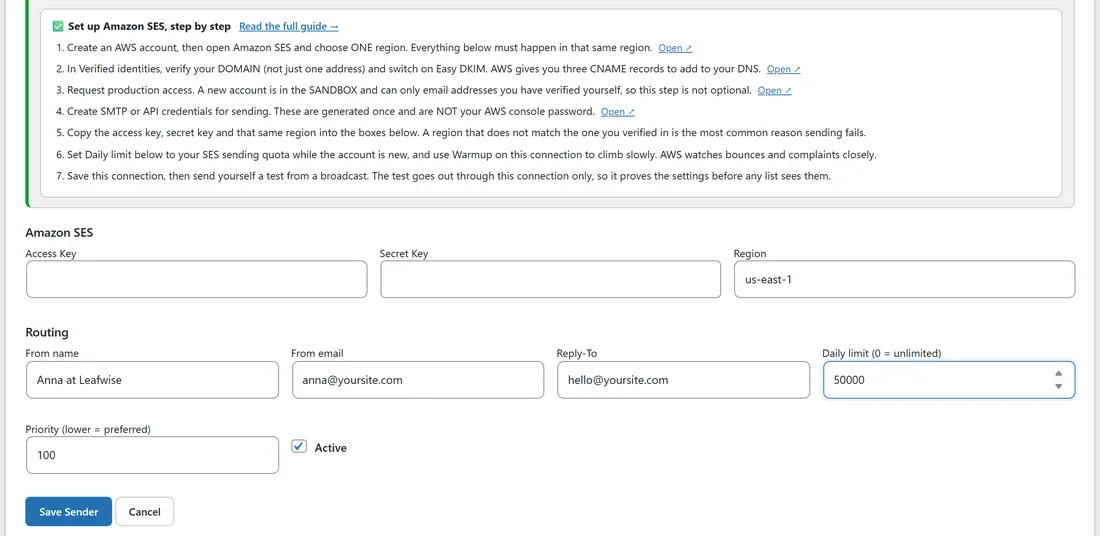
The Amazon SES part of the form has three boxes.
- Access Key: the access key ID from step 4.
- Secret Key: the secret access key from step 4. It is shown as dots.
- Region: the region code from step 1. It starts as us-east-1, so change it if you work in another region, for example eu-west-1.
Then fill in the rest of the form:
- Display name: something clear, such as Amazon SES (main).
- From name and From email: a person and an address on the domain you verified, for example Anna at Leafwise and anna@yoursite.com.
- Reply-To: where replies to the test go, for example hello@yoursite.com.
- Daily limit (0 = unlimited): your SES daily sending quota, shown on the SES Account dashboard. While the account is new, keep it at that quota and use warmup.
- Priority (lower = preferred): 10 if SES is your main connection.
- Active: leave it ticked.
Click Save Sender.
Step 6. Send a test:
On the Sending screen, click Test on the new Amazon SES row. A green box says "Test sent via Amazon SES (main)" and the email arrives at your site's administration address. The Last test column shows OK.
Step 7. Bounces and complaints from SES:
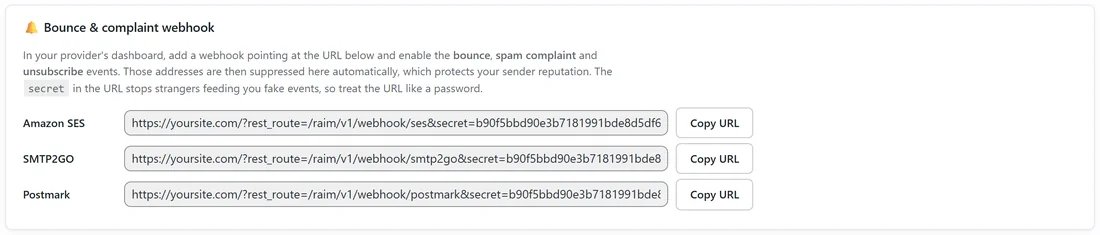
SES reports bounces and complaints through Amazon SNS. Set it up once and hard bounces and complaints reach your suppression list on their own.
- On the Sending screen, click Copy URL next to Amazon SES in the Bounce & complaint webhook box.
- In the AWS console, open Amazon SNS in the same region and create a topic, for example ses-feedback.
- Create a subscription on that topic with protocol HTTPS and paste the URL as the endpoint.
- Back in SES, open your verified domain and set its feedback notifications for Bounce and Complaint to that topic.
You do not need to confirm the SNS subscription by hand. The Mailer confirms it automatically when Amazon sends the confirmation message. SES says whether each bounce is permanent or temporary, and the Mailer suppresses permanent ones and only logs temporary ones.
Settle in without rushing:
- Switch on Warm up for this connection in Send Rotation & Warmup for the first sends. See Warmup: Drip A Big Send Through A Cold Server.
- Keep Daily limit in line with your SES quota. When it is reached, the next connection takes over or the queue waits.
- From names with accents, such as José, and emoji in subjects are sent as UTF-8, so they arrive as written.
- The Mailer switches nothing on at AWS. Open and click tracking are done by the Mailer itself.
A real example:
Leafwise Gardening sends from the us-east-1 region. Anna verified yoursite.com with Easy DKIM, got production access the next morning, and created an IAM user with SES sending permission. Her connection is called Amazon SES (main), From email anna@yoursite.com, Daily limit 50,000 and Priority 10. Its test passed, and its webhook URL is subscribed to an SNS topic, so a bounced address from Tuesday's newsletter was suppressed before Wednesday's email went out.
Tips:
- Write down your region code the moment you choose it. Every later step uses it.
- Keep a second connection, such as SMTP2GO, at priority 20 as automatic backup.
- Clean an old list with Verify Leads before its first send through SES. AWS watches bounce and complaint rates closely.
- When you need a higher quota, ask AWS from the SES Account dashboard, then raise Daily limit to match.
- For the domain records themselves, see Deliverability: SPF, DKIM And DMARC.
If something does not look right:
- If the test fails and mentions a signature or credentials, check that the Region box matches the region where you verified the domain, and that the access key was pasted without spaces.
- If the test fails and mentions an address that is not verified, either the From email is not on the verified domain, or the account is still in the sandbox. Check both on the SES Account dashboard.
- If only your own verified addresses receive mail, finish Step 3 and request production access.
- If emails wait in the queue partway through a big send, you have reached Daily limit. Raise your SES quota with AWS, then raise Daily limit.
- If mail arrives but lands in spam, check that the three DKIM records are in place and that the From email is on the verified domain.