Forms collect email addresses. Each form decides what it looks like, which fields it asks for, which lists and tags a sign-up gets, and what the visitor sees afterwards. A live preview beside the editor shows the form exactly as visitors will see it, updating as you type.
Popup campaigns (exit intent, timed popups, welcome mats, Spin-to-Win) are built in ResultsAiX Engage, the ResultsAiX popup builder. Engage sends every lead it captures into the lists you set here. Popups made earlier with the Mailer keep showing on your site as before.
Where to find it:
Forms, in the top menu. + New Form opens an empty editor; ✏️ Edit opens a form.
The Forms list:
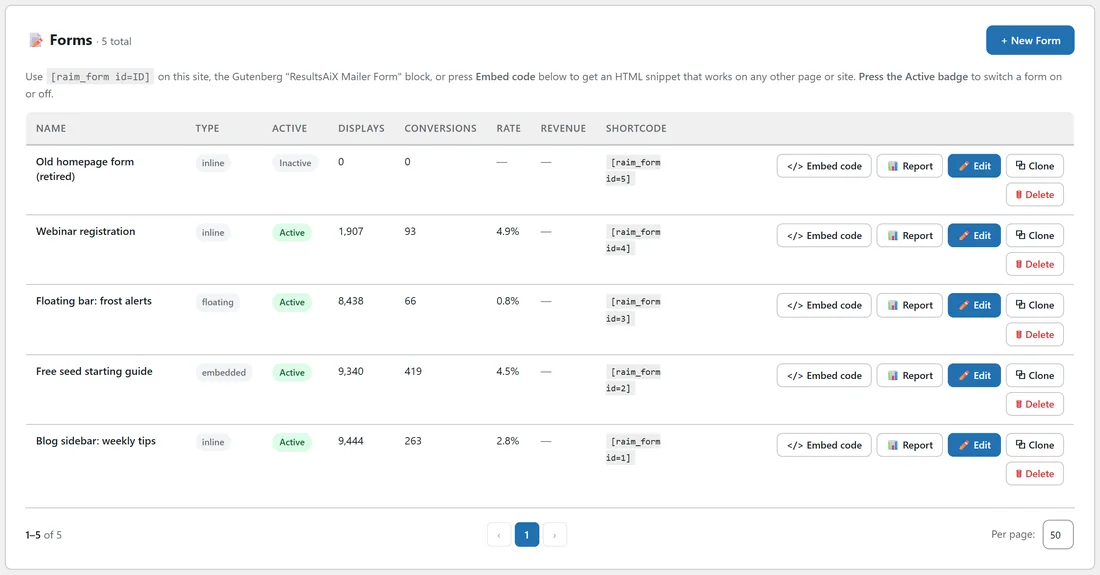
Each form shows the following.
- Name, with a ⚠ No list pill when the form adds people to no list.
- Type: inline, embedded, popup, floating or slidein.
- Active: the badge is a switch. Click it to turn the form on or off everywhere it is placed.
- Displays, Conversions and Rate: how often it was shown, how many signed up, and the share.
- Revenue: the lifetime spend of the people this form brought in, with orders and the average per person.
- Shortcode, for example [raim_form id=1].
The buttons on each row: </> Embed code (a preview and the code to paste), 📊 Report (the form's lead report), ✏️ Edit, ⧉ Clone (a copy that starts switched off) and 🗑 Delete (the subscribers it collected are kept). Under the list, a card links to ResultsAiX Engage for popups.
Building a form:
- Click + New Form.
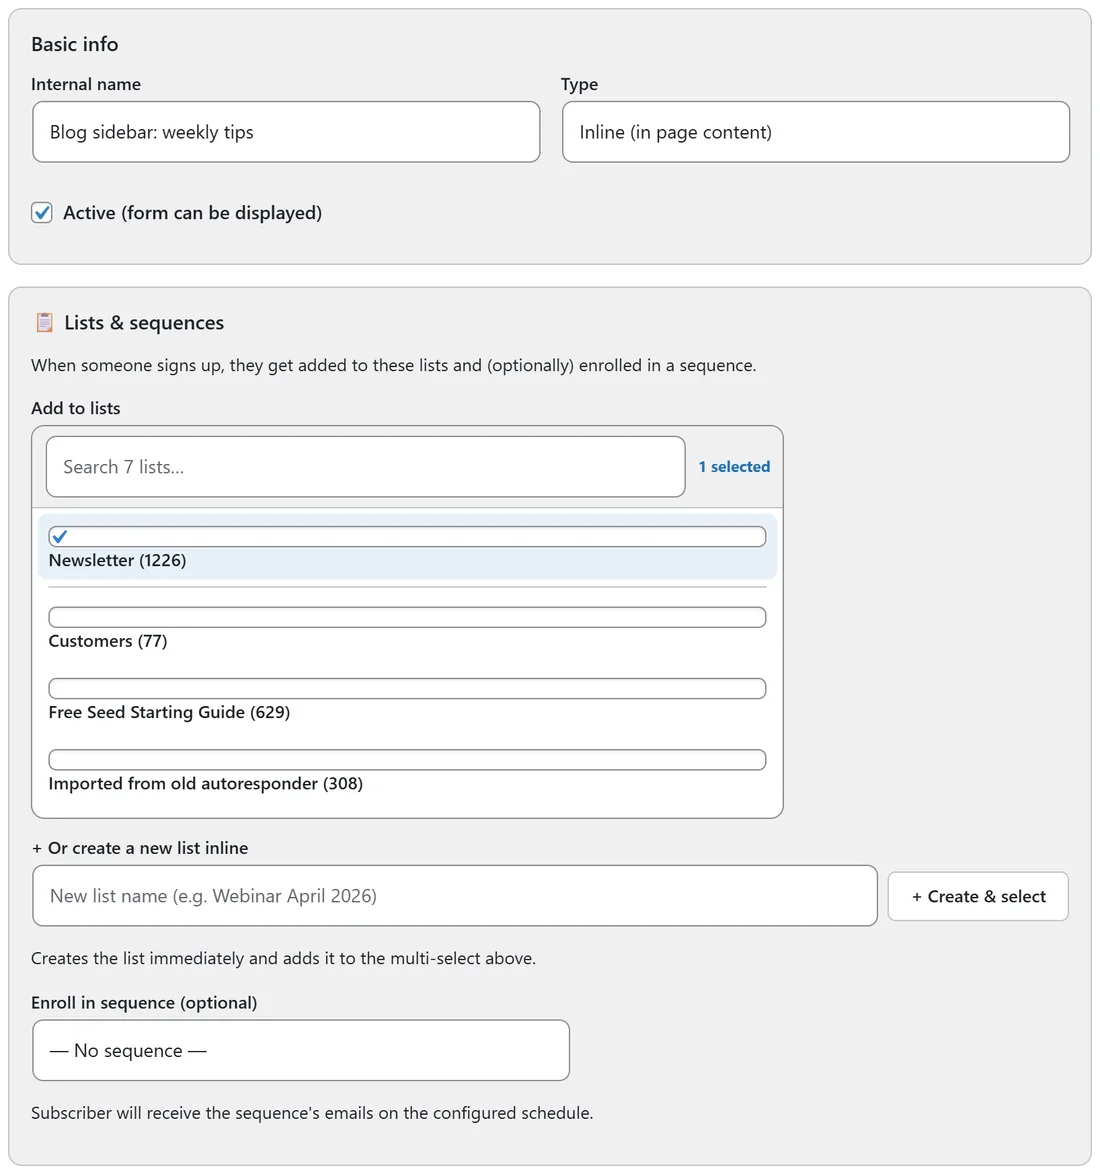
- Under Basic info, type an Internal name and choose the Type.
- Under 📋 Lists & sequences, pick one or more lists in Add to lists. Type a name in + Or create a new list inline and click + Create & select to make a new list without leaving the screen.
- Set 🛡️ Opt-in policy and 🏷️ Tags to apply.
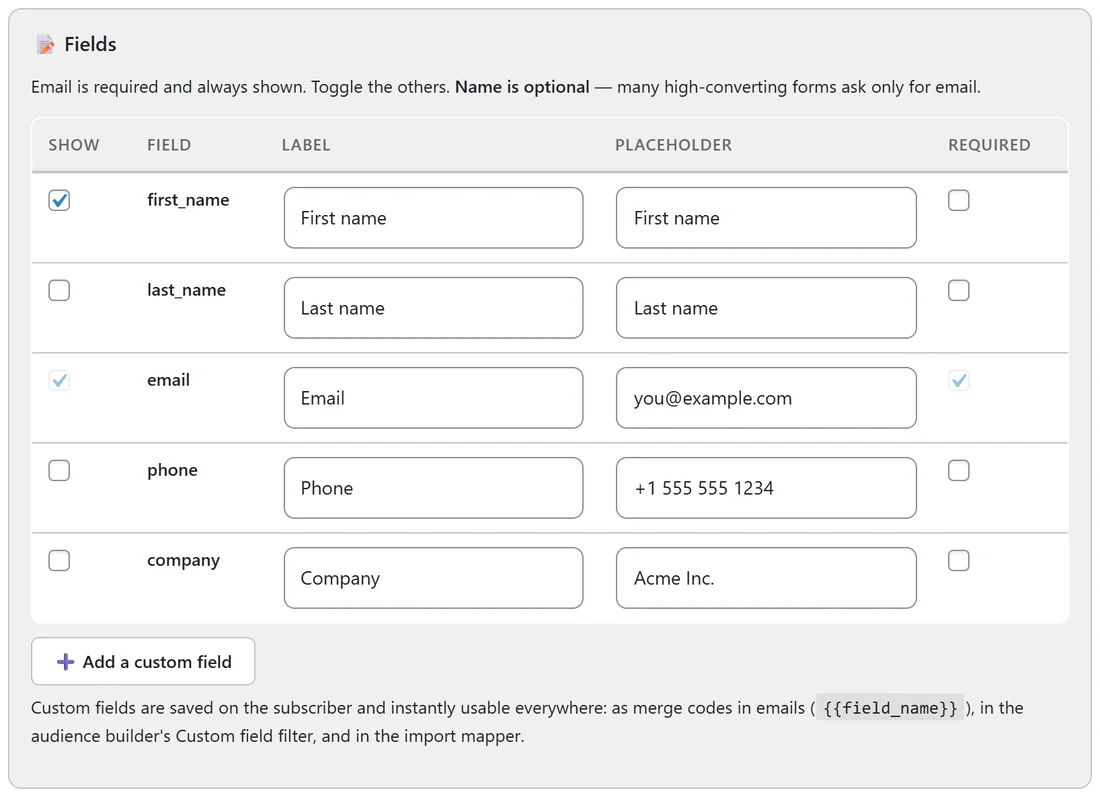
- In 📝 Fields, tick the fields to show, set their labels and placeholders, and tick Required where needed.
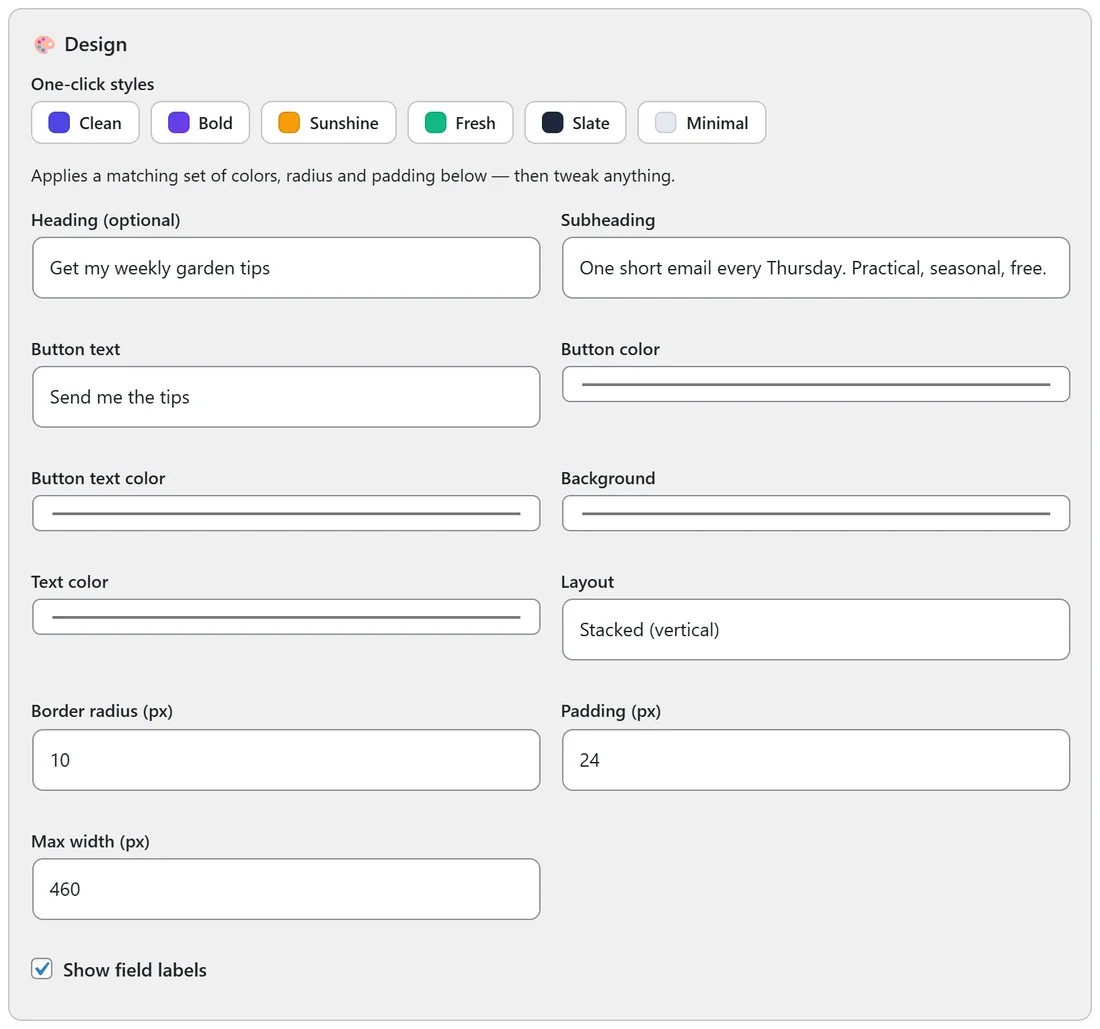
- Style it under 🎨 Design and watch the 👁 Live preview.
- Set ✅ After signup.
- Keep Active (form can be displayed) ticked and press 💾 Save form. The code to place it appears on the right.
Every setting:
- Type: Inline (in page content), Embedded (page widget), Popup (used by a popup), Floating bar (a strip across the bottom of every page) or Slide-in (slides into the bottom corner a few seconds after the page loads). Floating bars and slide-ins show themselves on this site while Active.
- Add to lists: where sign-ups go. Pick at least one; a form with no list still saves sign-ups as subscribers, but list filters, segments and list-based syncs will not see them.
- Enroll in sequence (optional): for sequences you already have. New flows start from an automation with the trigger Submits a form.
- Double opt-in: Follow list setting (default), Force ON (always send a confirmation email), or Force OFF (subscribe at once, for example after a purchase).
- Tags to apply: comma-separated tags added on sign-up, for example blog-signup. New tags are created automatically.
- Fields: first_name, last_name, email, phone and company. Email is always shown and always required. Name fields always come before email. ➕ Add a custom field adds your own field, saved on the subscriber and usable as a merge code ({{field_name}}), in the audience builder and in the import mapper.
- Design: six One-click styles (Clean, Bold, Sunshine, Fresh, Slate, Minimal), then Heading (optional), Subheading, Button text, Button color, Button text color, Background, Text color, Layout (Stacked or Inline), Border radius (px), Padding (px), Max width (px) and Show field labels.
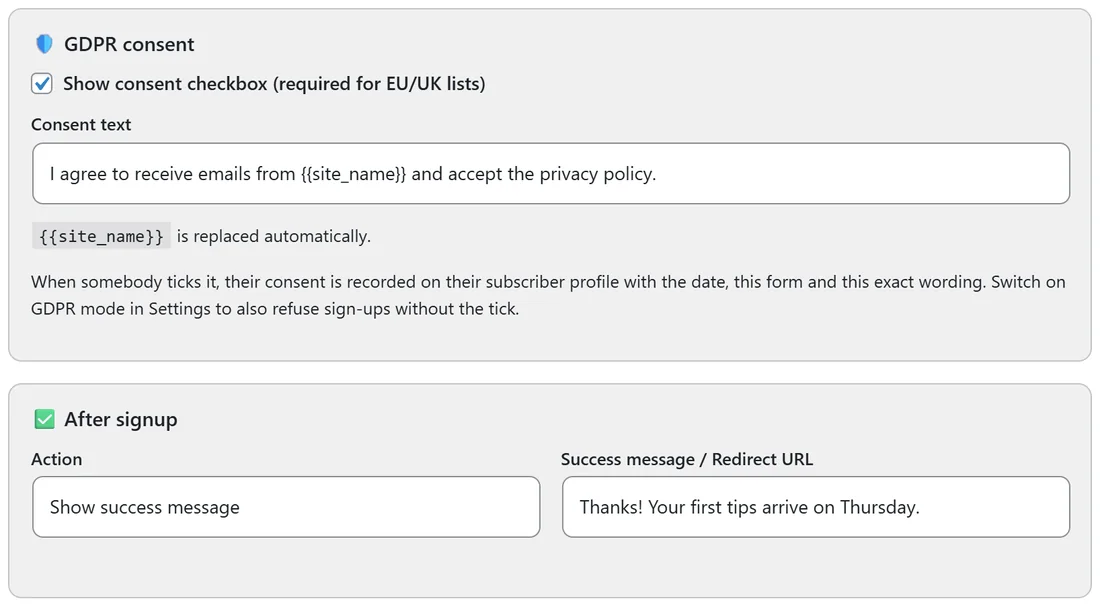
- 🛡️ GDPR consent: Show consent checkbox, with your own Consent text ({{site_name}} is filled in). When somebody ticks it, their consent is recorded on their profile with the date, the form and the exact wording. With GDPR mode switched on in Settings, a sign-up without the tick is refused.
- After signup: Show success message (with your message) or Redirect to URL (to a thank you page).
The live preview:
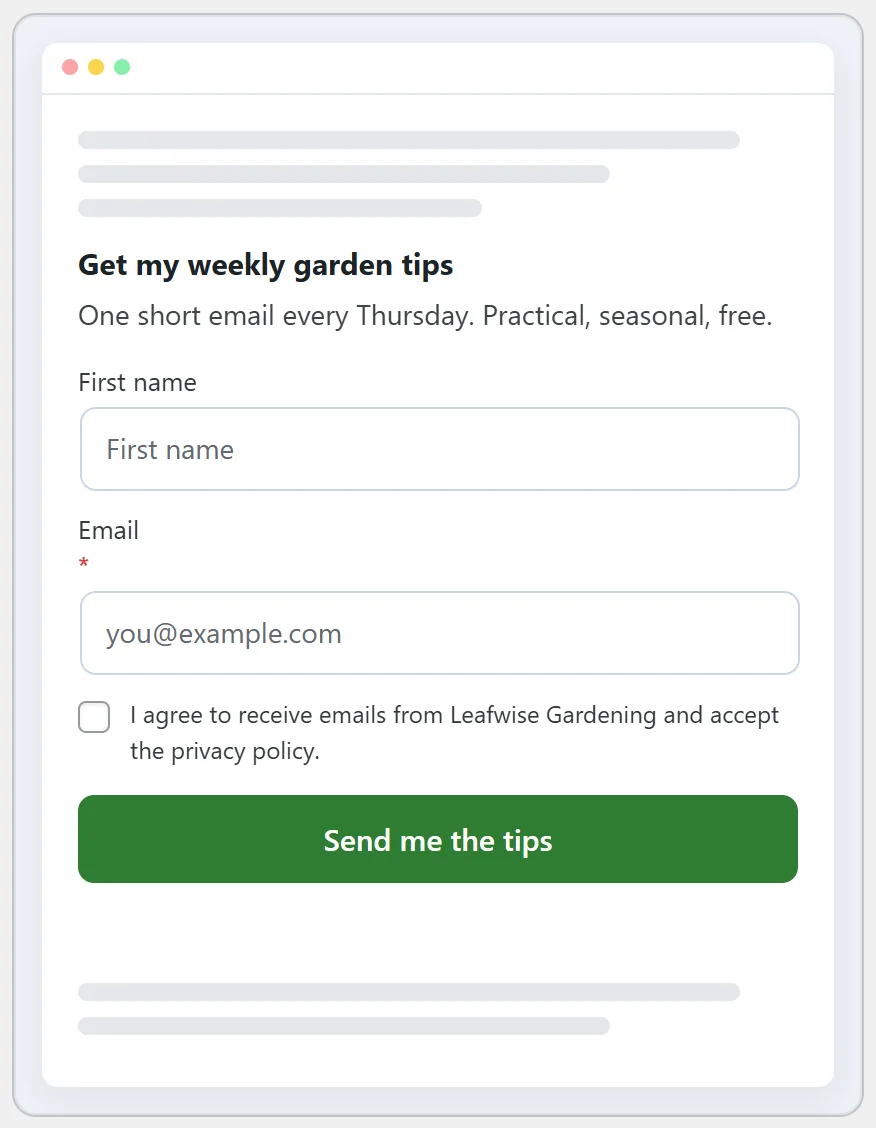
The 👁 Live preview shows the form inside a mock web page, using the same code your visitors get. Switch between 🖥 Desktop and 📱 Mobile to check both.
Spam protection:
Every form has protection built in, with nothing to set up. A hidden field catches bots, a sign-up sent within two seconds of the page loading is asked to try again, one connection can sign up at most 10 times in 10 minutes, and the same address on the same form within 10 minutes is quietly ignored.
The form report:
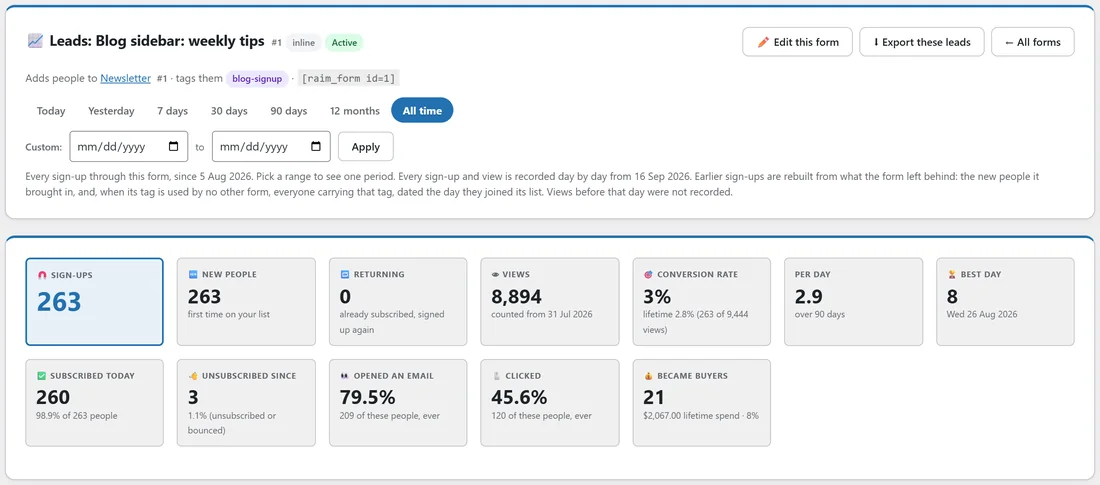
📊 Report on the list opens Leads for that form: sign-ups, new and returning people, views, conversion rate, sign-ups per day, the best day, who is subscribed today, who opened and clicked, and who became buyers. Charts show sign-ups by day, by weekday and by hour, and cards show the pages, UTM sources, campaigns, countries and devices they came from. The people table lists everyone, newest first, and ⬇ Export these leads downloads them. The date pills work like every other report.
Popups:
Popups now live in ResultsAiX Engage. Build the campaign there and point its lead capture at this plugin: every lead lands in the lists set on your forms here. A form of type Popup is ready to be shown by an Engage campaign. Popups created in the Mailer before keep running on your site.
A real example:
Leafwise Gardening's "Blog sidebar: weekly tips" form is Inline, adds people to Newsletter, tags them blog-signup and shows First name and Email. Its heading is "Get my weekly garden tips", the button says "Send me the tips", the consent box is on, and after sign-up it says "Thanks! Your first tips arrive on Thursday." It has been shown 9,444 times and has 263 sign-ups (2.8%). Because the Newsletter welcome series starts on Submits a form: Blog sidebar: weekly tips, every sign-up gets the welcome emails.
Tips:
- Let the AI design the form from a sentence. See Build Me A Form: Describe It Or Say It.
- Place the form on this site or any other site. See Embedding Forms On Any Website.
- Start a welcome series from the form with the Submits a form trigger. See Automation Triggers Explained.
- Custom fields are covered in Custom Fields: Create Your Own Data.