Brevo, which used to be called Sendinblue, is a friendly all rounder that suits a list starting out. Many Brevo plans count sends per day rather than per month, so the one setting to get right is Daily limit.
What you need before you start:
- A Brevo account (sign up at brevo.com).
- Access to the DNS for your sending domain.
- Your plan's daily sending allowance, shown in your Brevo account.
Where to find it:
In ResultsAiX Mailer open Delivery, then Sending, click + Add Sender and choose Brevo (Sendinblue) in the Provider dropdown. The checklist "Set up Brevo (formerly Sendinblue), step by step" appears with one API Key box.
Step 1. Authenticate your domain at Brevo:
- In your Brevo account, open the senders and domains settings and add your sending domain, for example yoursite.com.
- Brevo gives you a Brevo verification record and DKIM records. Add them at your DNS host.
- Wait until Brevo shows the domain as authenticated.
Step 2. Create an API key:
In Brevo, open SMTP & API and create a key on the API keys tab. Use an API key, not an SMTP key, because this connection talks to Brevo's API. Copy it straight away.
Step 3. Fill in the form:
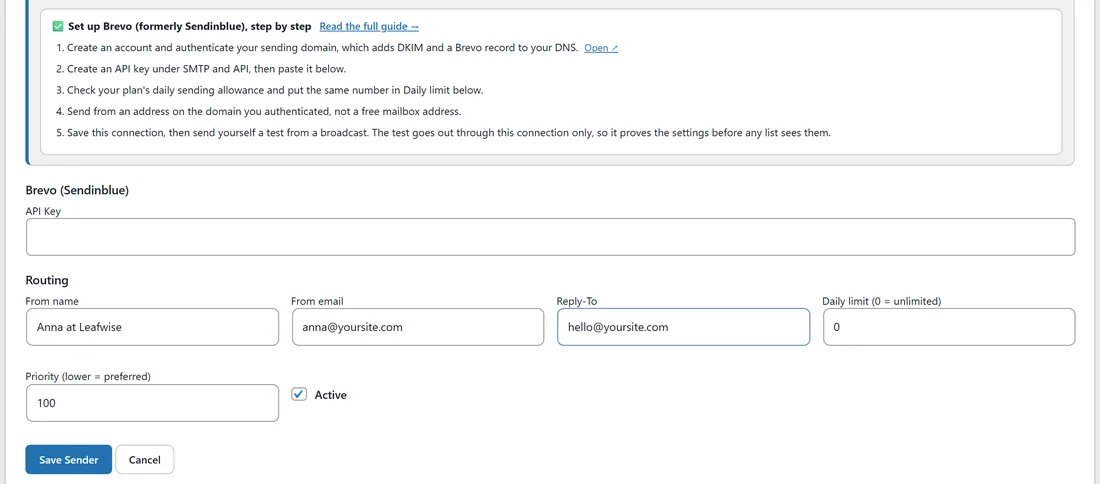
The Brevo part of the form has one box.
- API Key: the key from step 2, shown as dots.
Then fill in the rest of the form:
- Display name: for example Brevo.
- From name and From email: an address on the authenticated domain, for example Anna at Leafwise and anna@yoursite.com. Avoid a free mailbox address.
- Reply-To: for example hello@yoursite.com.
- Daily limit (0 = unlimited): exactly your plan's daily sending allowance. This is the most important box for Brevo.
- Priority (lower = preferred): 10 for your main service, or 20 for a backup.
- Active: leave it ticked.
Click Save Sender, then click Test on the new row.
Why Daily limit matters most here:
When this connection reaches its Daily limit, it stops for the day. If you have another connection, that one carries on. If you do not, the rest of the queue waits and continues the next day, when Sent today goes back to 0. Nothing is marked failed.
For a broadcast bigger than your daily allowance, you can send it in waves on purpose (see Sending A Broadcast In Waves), or add a second connection and share the load (see SMTP Rotation: Spread Sends Across Many Connections).
Step 4. Set up the webhook:
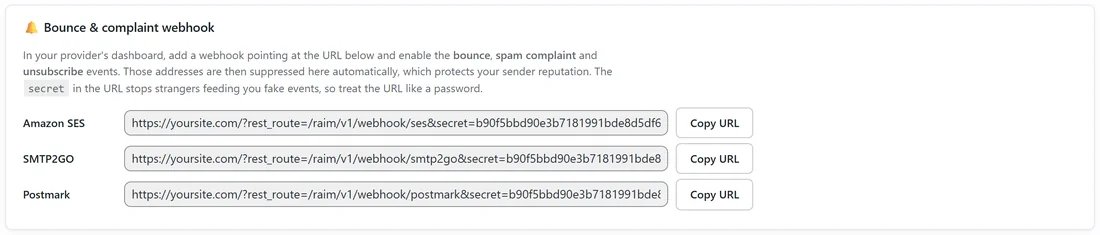
- On the Sending screen, click Copy URL next to Brevo (Sendinblue) in the Bounce & complaint webhook box.
- In Brevo, open the transactional webhooks settings and add a webhook with the URL.
- Tick hard bounce, soft bounce, blocked, invalid email, complaint (spam) and unsubscribed, and save.
Every bounce event is logged. Hard bounces and invalid addresses are suppressed, a soft bounce is only suppressed after it repeats, and complaints and unsubscribes are suppressed straight away.
A real example:
A small Leafwise Gardening workshop list of 1,800 readers goes through Brevo. Anna's plan allows 300 emails a day, so she sets Daily limit to 300 and Priority to 10 on a connection called Brevo. A Monday broadcast to all 1,800 goes out over six days, 300 a day, with no failed sends and no extra work from her.
Tips:
- Check your Brevo plan's daily allowance whenever you change plan, and update Daily limit to match.
- Send from your own authenticated domain. See Deliverability: SPF, DKIM And DMARC.
- Switch on Warm up for a new Brevo account. See Warmup: Drip A Big Send Through A Cold Server.
- Watch the bounce rate on your first few sends in Reports, and clean older lists with Verify Leads.
If something does not look right:
- If the test fails with a key message, check that you copied an API key from the API keys tab, not an SMTP key.
- If the test fails and mentions the sender, authenticate the domain in Brevo or use a From email on a domain Brevo already shows as authenticated.
- If sending stops at the same number every day, that is your plan's daily allowance. Set Daily limit to that number so the Mailer pauses neatly and continues tomorrow.