Mailjet is a solid European service. Its one difference from the other services on the Sending screen is that it uses a pair of credentials, an API key and a secret key, and both are needed for an email to send.
What you need before you start:
- A Mailjet account, created on the Mailjet website.
- Access to the DNS for your sending domain.
- About fifteen minutes.
Where to find it:
In ResultsAiX Mailer open Delivery, then Sending, click + Add Sender and choose Mailjet in the Provider dropdown. Its checklist and two boxes, API Key and Secret, appear.
Step 1. Authenticate your domain at Mailjet:
- In your Mailjet account, add your sending domain, for example yoursite.com.
- Add the SPF and DKIM records it gives you at your DNS host.
- Wait for the domain to show as authenticated.
Step 2. Copy both keys:
In Mailjet, open API key management. Copy BOTH values: the API key and the secret key.
Step 3. Fill in the form:
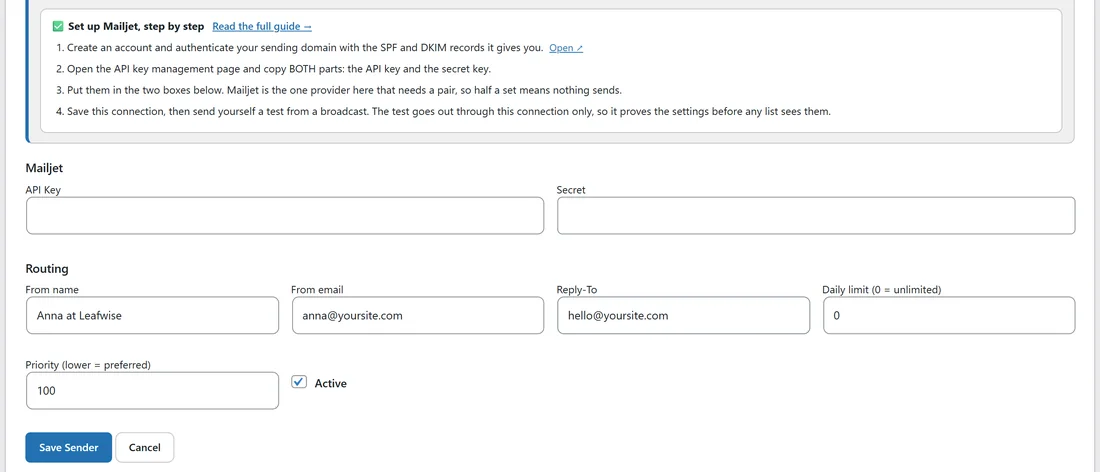
The Mailjet part of the form has two boxes.
- API Key: the API key from step 2. It is shown as plain text so you can check it.
- Secret: the secret key from step 2, shown as dots.
Then fill in the rest of the form:
- Display name: for example Mailjet.
- From name and From email: an address on the authenticated domain, for example Anna at Leafwise and anna@yoursite.com.
- Reply-To: for example hello@yoursite.com.
- Daily limit (0 = unlimited): your plan's daily allowance. Some Mailjet plans count per day as well as per month.
- Priority (lower = preferred): 10 for your main service, or 20 for a backup.
- Active: leave it ticked.
Click Save Sender, then click Test on the new row.
Two keys that belong together:
The Mailer signs every request with the API key and the secret together. If either box is empty the connection does not send, and the error says "Mailjet API key + secret required". If the two are from different key pairs, Mailjet reports an authentication error.
Step 4. Set up the event webhook:
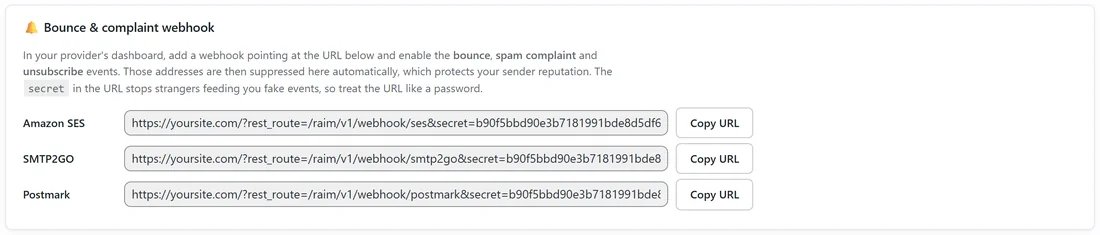
- On the Sending screen, click Copy URL next to Mailjet in the Bounce & complaint webhook box.
- In Mailjet, open the event notification (webhook) settings and paste the URL for the events you want.
- Use it for bounce, blocked, spam and unsubscribe.
Mailjet flags each bounce as hard or soft, and the Mailer suppresses hard bounces and logs soft ones. Spam complaints and unsubscribes are suppressed straight away.
How Mailjet and the Mailer work together:
- The Mailer switches off Mailjet's own open and click tracking on every email, because it tracks opens and clicks itself.
- Reply-To and custom headers are only sent when they have a value, which keeps Mailjet's strict checks happy.
A real example:
Leafwise Gardening adds Mailjet as a European backup. Anna copies the API key and secret key from API key management, adds a connection called Mailjet with From email anna@yoursite.com, Daily limit 6,000 and Priority 40, and clicks Test. Last test shows OK.
Tips:
- Copy the two keys one after the other from the same page, so they always come from the same pair.
- If you create a new key pair in Mailjet, update both boxes at once.
- Switch on Warm up for a new account. See Warmup: Drip A Big Send Through A Cold Server.
- Send from your authenticated domain, not a free mailbox. See Deliverability: SPF, DKIM And DMARC.
If something does not look right:
- If the test fails with "Mailjet API key + secret required", fill in both boxes and click Save Sender again.
- If the test fails with an authentication error, check that the API key and secret are from the same pair and not the wrong way round.
- If the test fails and mentions the sender, authenticate the domain in Mailjet first, or use a From email that Mailjet already shows as validated.